


Articles
Tile Roof Repair (6 Simple Steps For Homeowners)
 Written by : Secured Roofing and Restorations
 7 minutes read


Tile roofs are known for their durability and aesthetic appeal. However, like any roofing material, they can suffer damage over time. Whether it’s due to severe weather, fallen branches, or general wear and tear, knowing how to repair your tile roofing is essential for maintaining your home’s integrity. In this guide, we’ll cover everything you need to know about tile roof repair, including:
- The popularity of tile roofs
- Benefits of tile roof repair
- 6 steps to repair roof tiles
👉 The Popularity of Tile Roofs
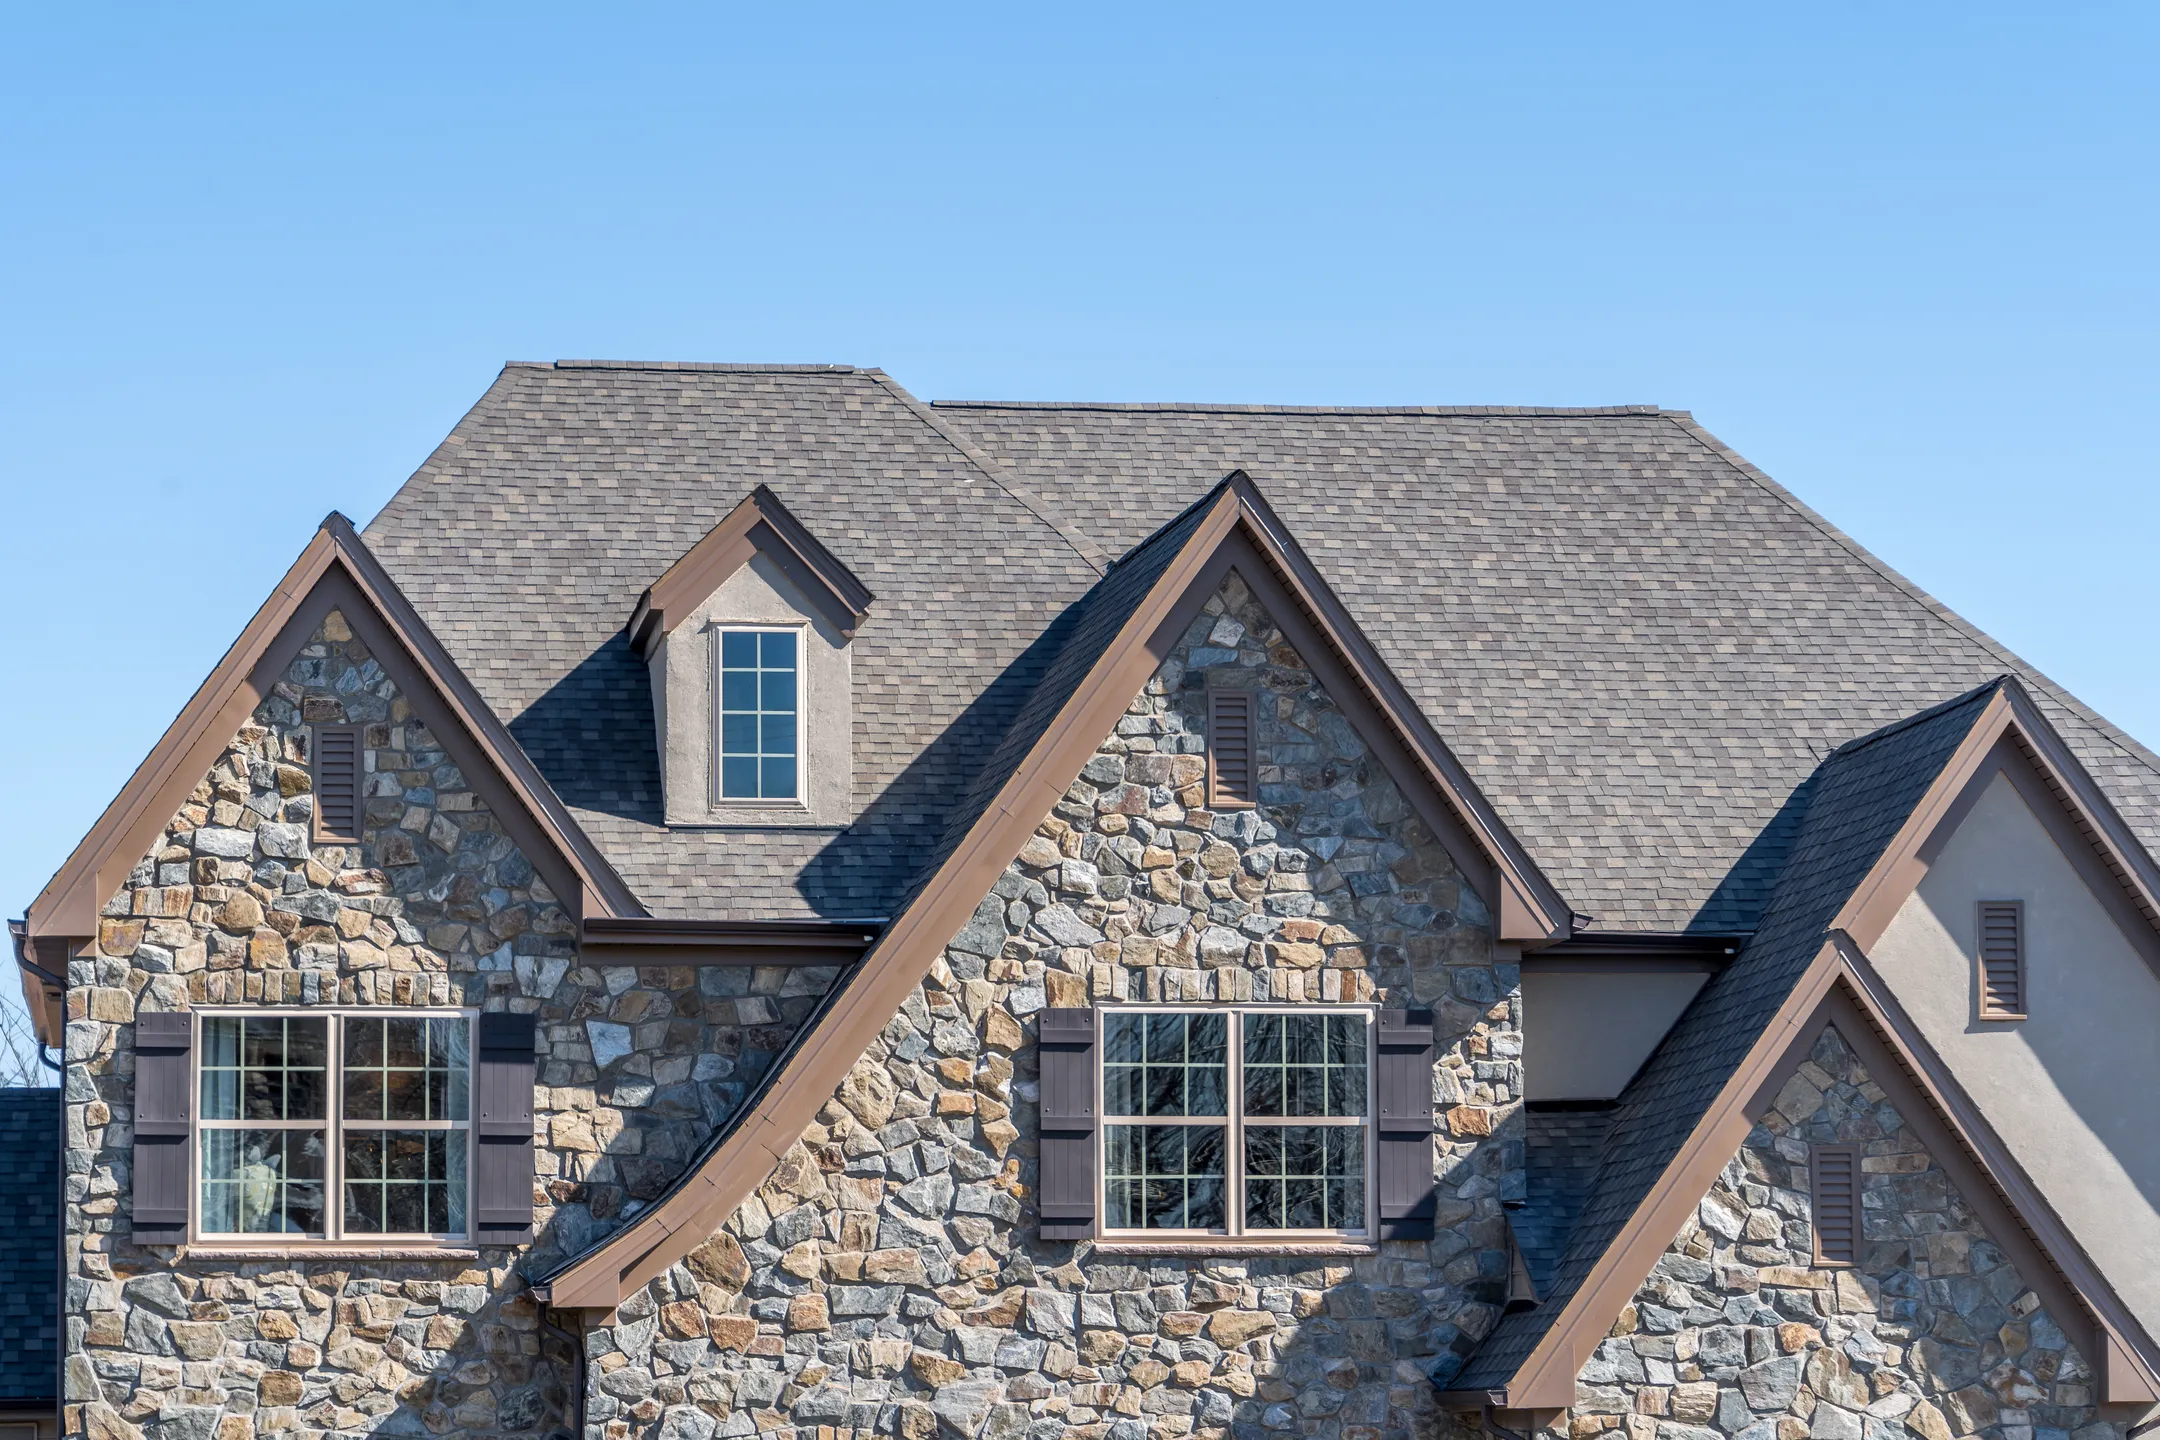
Tile roofs have been around for centuries, prized for their longevity and classic look. Homeowners often choose them for their aesthetic appeal and ability to withstand harsh weather conditions. But despite their sturdiness, they still require maintenance and occasional repair.
Why Choose Tile Roofs?
Tile roofs are not just about aesthetics; they offer a multitude of benefits that make them a wise investment for homeowners. Some key advantages include:
- Excellent insulation properties for improved energy efficiency.
- Natural fire resistance, enhancing safety against fire hazards.
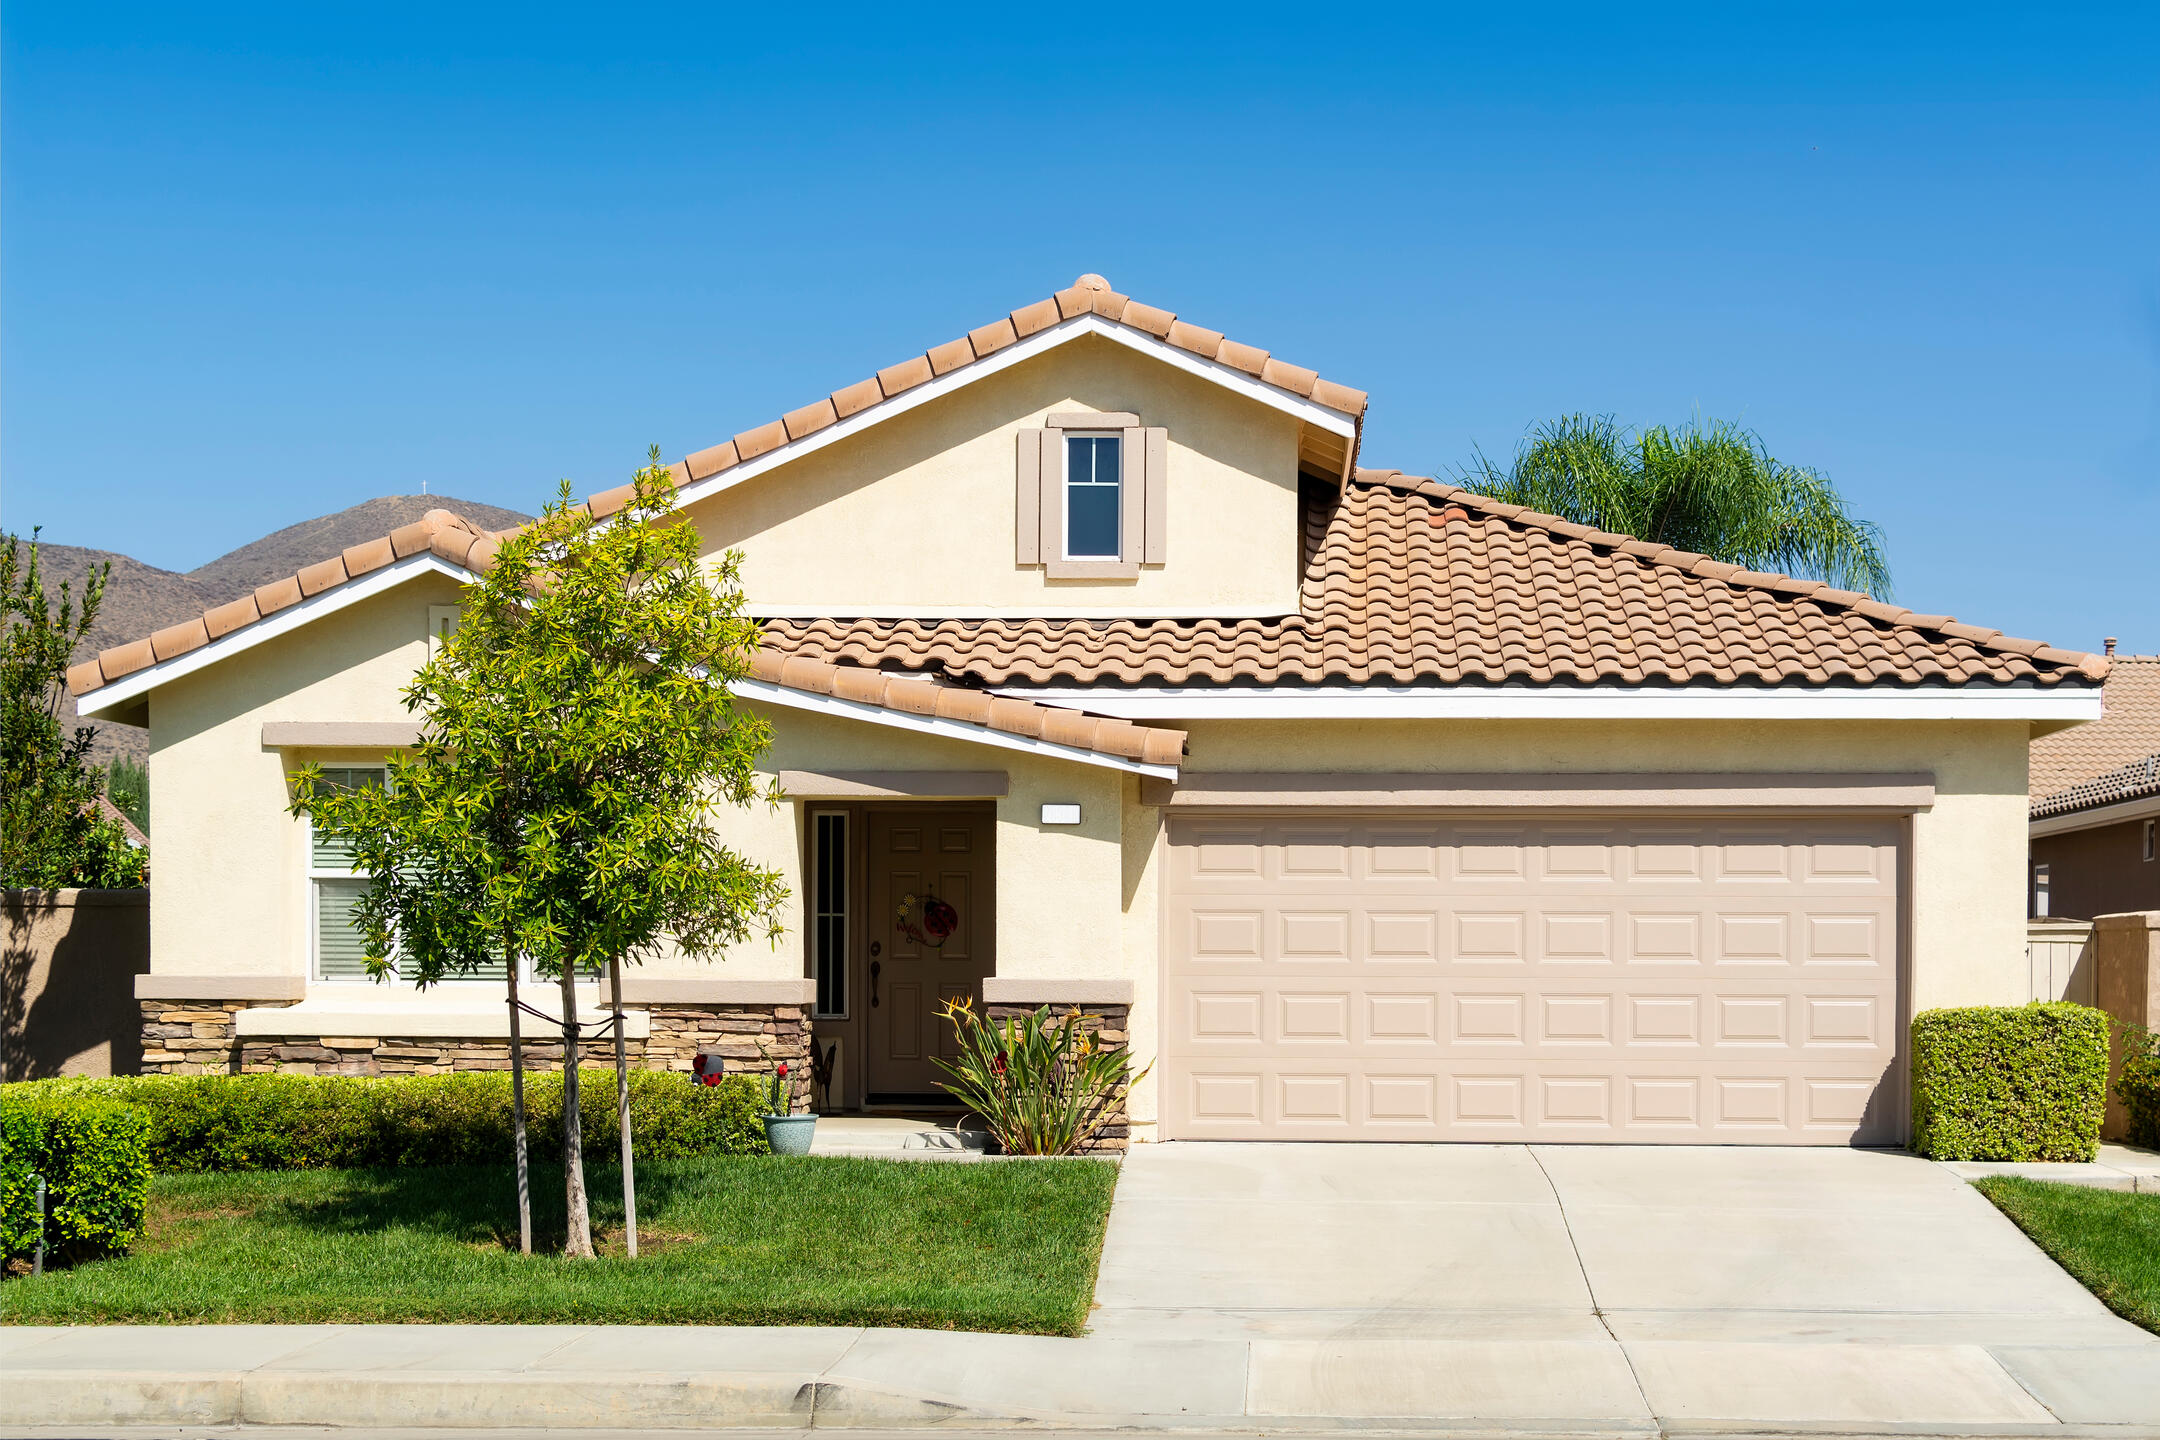
- Longevity, with proper maintenance, lasting up to 100 years.
- Increased property value and curb appeal.
Their durability and longevity appeal to homeowners seeking a sustainable and reliable roofing solution.
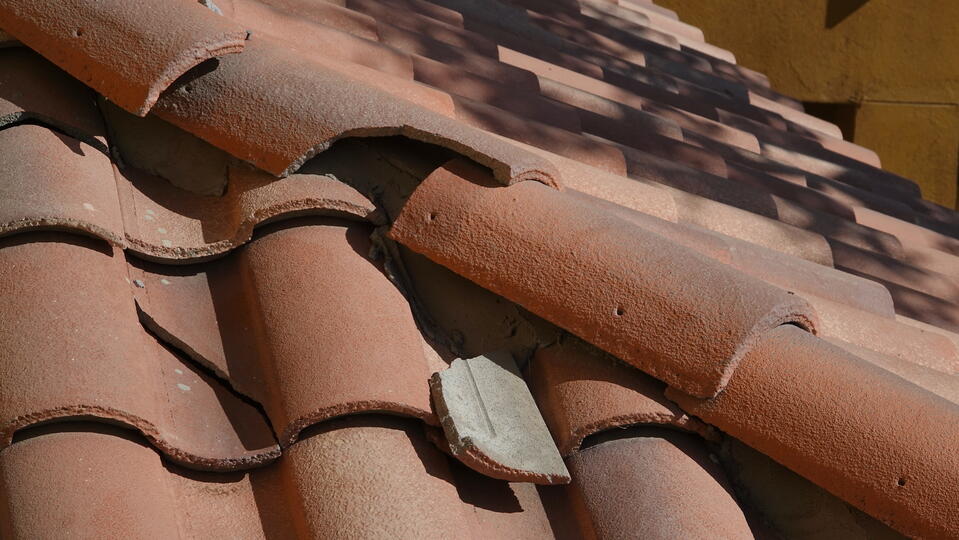
Common Issues with Tile Roofs
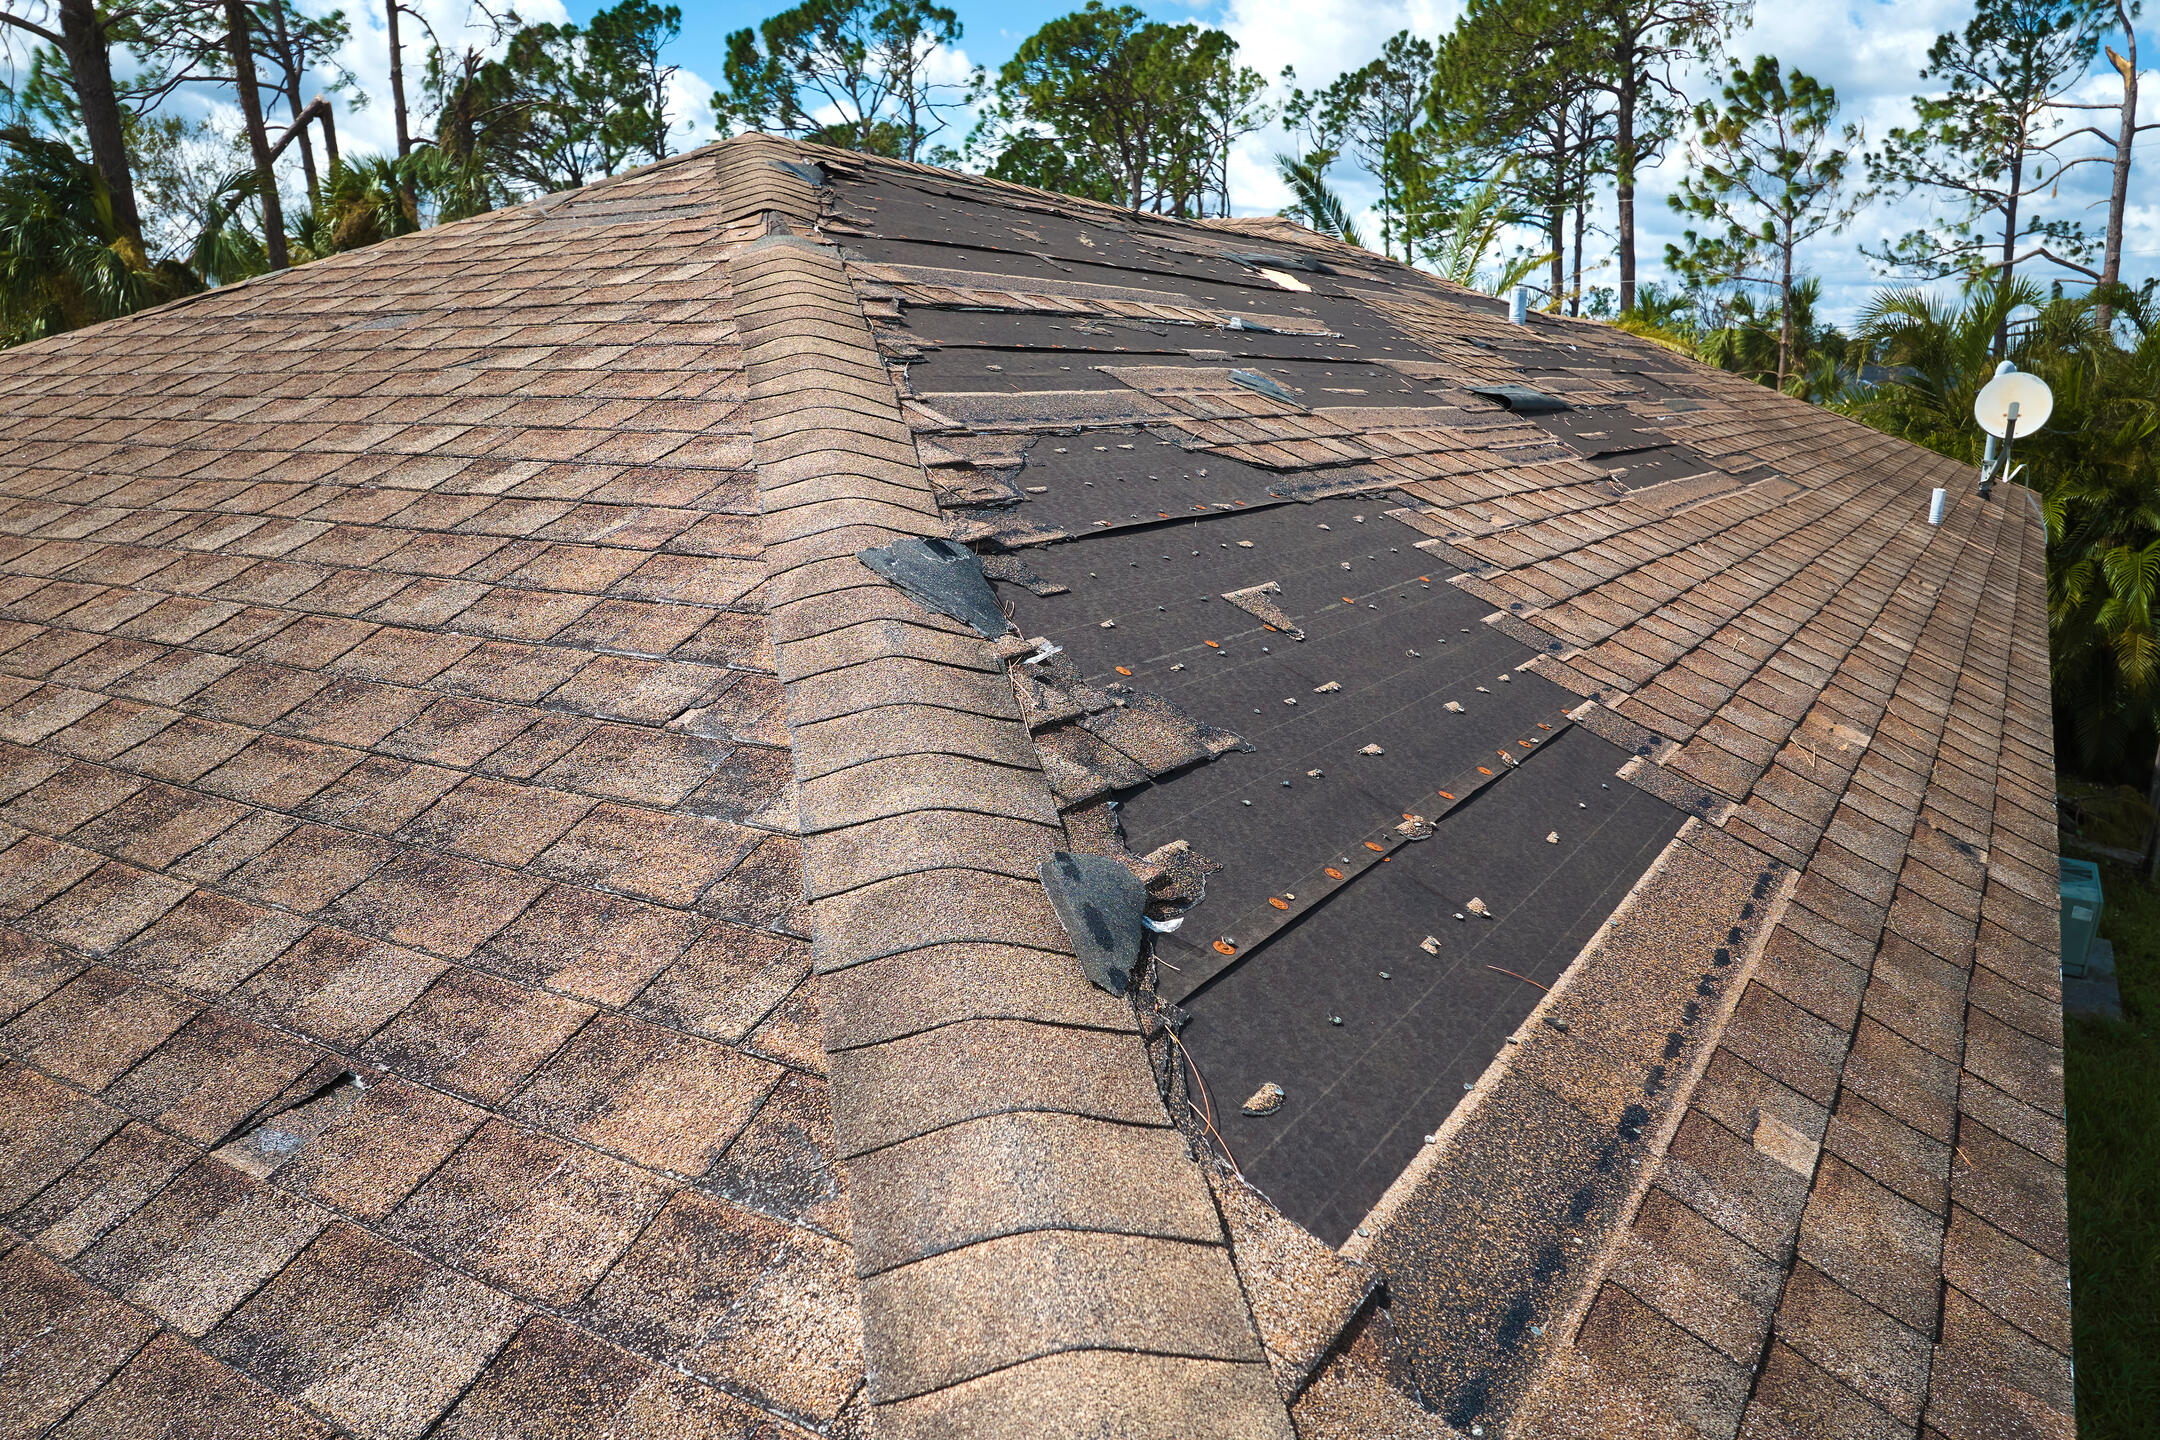
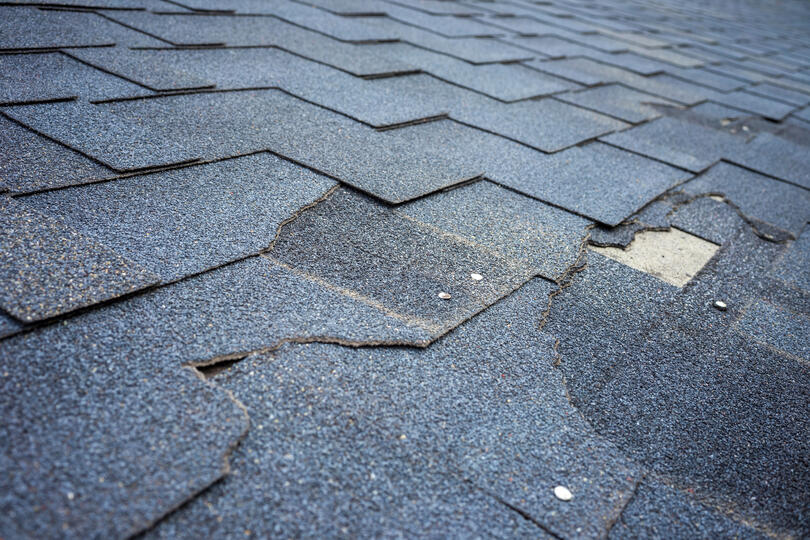
Despite their durability, tile roofs are not immune to issues. Homeowners may encounter problems such as cracked or broken tiles, which can occur due to harsh weather conditions, impacts from debris, or age. Water leakage is another concern, as it can lead to interior damage and mold growth if not addressed promptly. Mold growth is particularly concerning not only for the integrity of the roof but also for the health of the occupants. Regular inspections and prompt repairs are crucial in managing these common issues, as neglecting them can lead to more significant damage and costly repairs down the line.
The Importance of Regular Maintenance
Regular maintenance is key to extending the life of your tile roof and ensuring it remains visually appealing and functional. This includes periodic inspections to identify any potential issues before they escalate. Minor repairs, such as replacing damaged tiles or cleaning debris from the roof surface, can prevent small problems from turning into major headaches.
Establishing a maintenance schedule is a practical approach that can save homeowners money in the long run, as proactive care often prevents the need for extensive repairs or premature roof replacement. By investing time in regular maintenance, homeowners can enjoy the benefits of their tile roof for decades to come.
✅ Benefits of Tile Roof Repair
Understanding the benefits of repairing your tile roof can motivate you to take action when needed. Here are some key advantages:
Cost Savings: DIY repairs can save you a significant amount of money compared to hiring professionals. Plus, regular maintenance can prevent costly damage in the future.
Increased Home Value: A well-maintained roof enhances your home’s curb appeal and can increase its market value. Potential buyers are more likely to invest in a property with a sturdy, attractive roof.
Improved Energy Efficiency: Repairing damaged tiles can improve your roof’s insulation, leading to better energy efficiency. This means lower utility bills and a more comfortable living environment.
Extended Roof Lifespan: Regular repairs can extend the lifespan of your tile roof, ensuring that it continues to protect your home for years to come.
Enhanced Weather Resistance: Repairing any damaged tiles helps your roof better withstand harsh weather conditions, reducing the risk of leaks and further damage.
Better Aesthetic Appeal: Addressing issues with your tile roof can restore its appearance, making your home look well-cared-for and appealing.
Preventative Maintenance: Repairing small issues before they escalate can save you time and money in the long run, preventing major repairs down the line.
Peace of Mind: Knowing that your roof is in good condition provides peace of mind, allowing you to focus on other aspects of homeownership without worry.
🛠️ 6 Steps to Repair Roof Tiles
Repairing roof tiles might seem intimidating, but with the right approach, it’s straightforward. Here are the steps you need to follow:
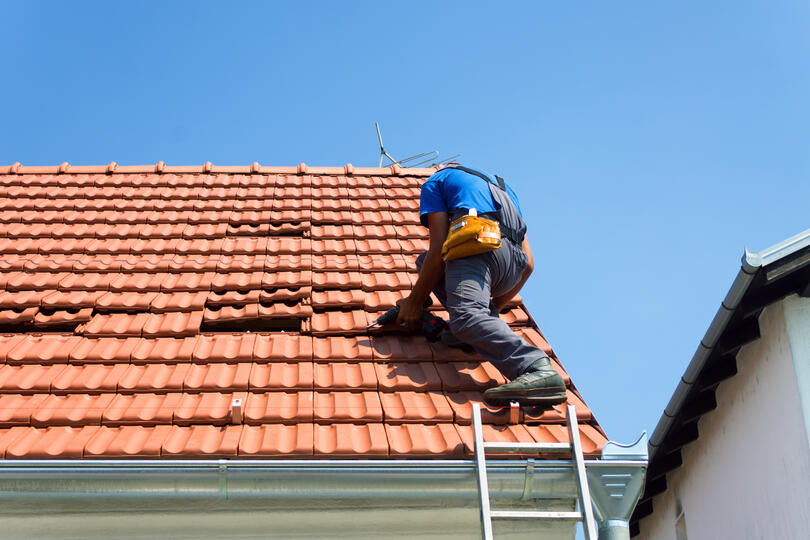
1. Safety First
Before starting any repair project, safety should always be your top priority. Make sure you have all the necessary safety gear to protect yourself during the process. This includes durable gloves to safeguard your hands from sharp edges and debris, safety glasses to shield your eyes from falling materials, and a sturdy ladder that can support your weight and reach the necessary height safely. It’s also a good practice to work with a partner whenever possible. Having someone with you not only provides an extra set of hands but also ensures assistance in case of any emergencies, making the entire process much safer.
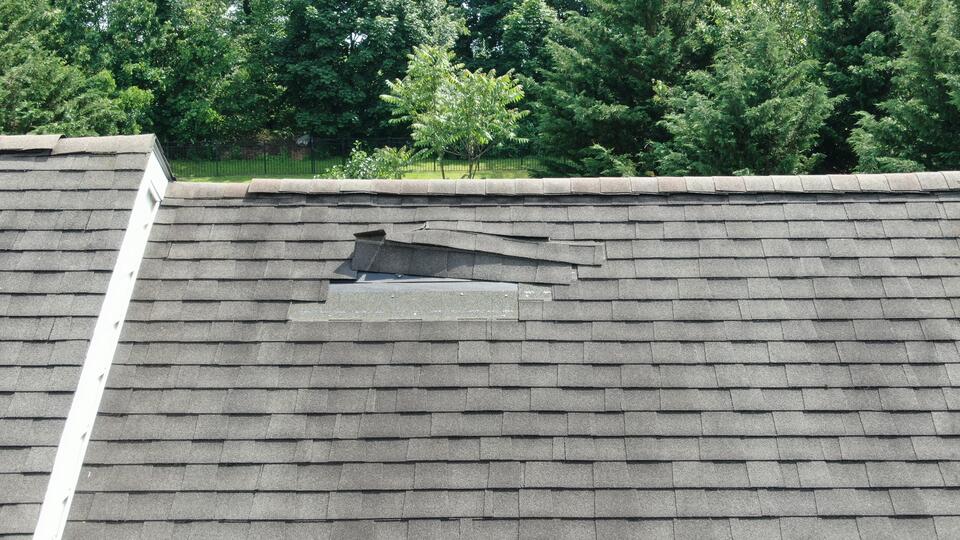
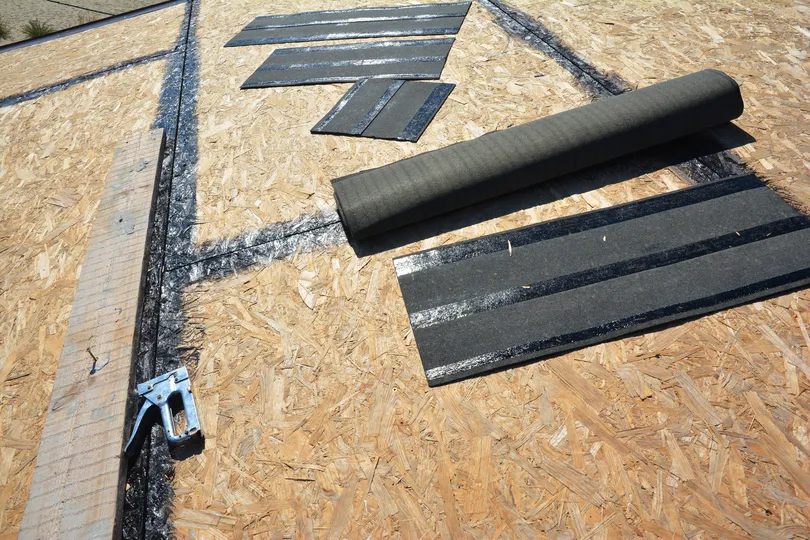
2. Locate the Damaged Tiles
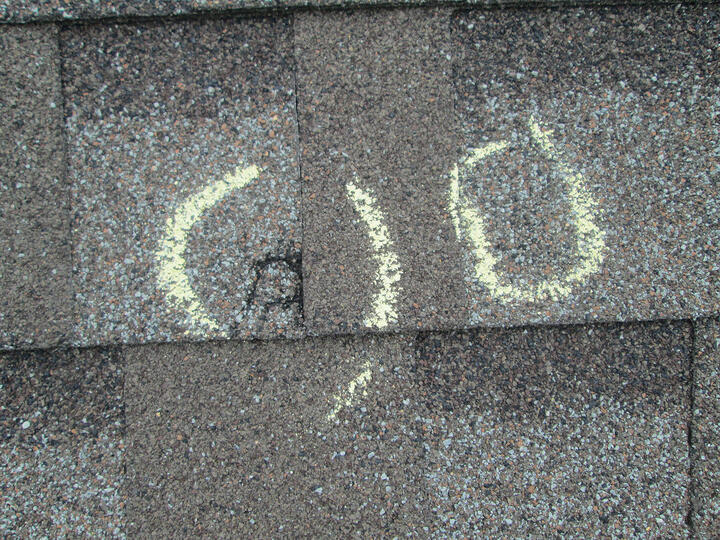
Carefully inspect your roof to identify any damaged tiles that may need replacement. Take your time to look for visible signs of wear, such as cracks, chips, or tiles that are completely missing. It may help to use binoculars from the ground to get a better view. As you identify these issues, mark them clearly with chalk or tape, so you can easily find them when you’re ready to make the repairs. You might also want to take photos for reference, which can be especially helpful if you’re hiring someone to assist in the repair.
3. Remove the Damaged Tiles
To remove the damaged tiles, utilize a flat pry bar to gently lift the affected tile from its position. Be careful when doing this, as it’s essential not to damage the surrounding tiles during the removal process. Take your time and apply even pressure to avoid breaking adjacent tiles. Once the damaged tile is lifted, slide it out carefully, and set it aside for proper disposal later. If you’re facing difficulty lifting the tile, check to see if there are any nails or fasteners holding it in place that need to be removed first.
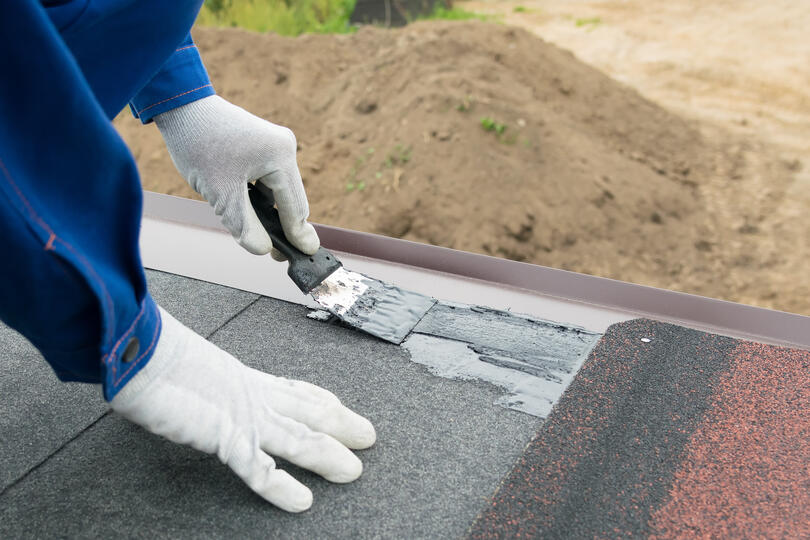
4. Install the New Tile
After successfully removing the damaged tile, it’s time to install the new one. Begin by sliding the new tile into place, ensuring it fits snugly and aligns perfectly with the surrounding tiles to maintain the aesthetic and waterproofing of the roof. If necessary, use a rubber mallet to gently tap the tile into position, taking care not to use excessive force, which could cause damage. Once the tile is secured in place, use roofing nails or adhesive, depending on your roof type, to fasten it firmly. Ensure that you follow the manufacturer’s guidelines for any specific installation requirements.
5. Check for Proper Fit
Once the new tile is installed, take a moment to inspect the fit carefully. It’s crucial that the new tile sits snugly and aligns correctly with the rest of the roof. Look for any gaps or misalignments that might compromise the integrity of your repair. If you notice any discrepancies, make the necessary adjustments, such as repositioning the tile or tightening the fasteners. A seamless repair not only enhances the appearance of your roof but also ensures that it functions correctly, preventing leaks and further damage.
6. Clean Up
After completing the tile replacement, take a moment to clean up the work area on the roof. This includes clearing away any debris, such as broken tiles, nails, and excess materials, to ensure a safe working environment. Properly dispose of the damaged tiles and any other waste according to your local regulations. Additionally, check that all tools are accounted for and securely stored away. Finally, ensure that the area is safe and free of hazards to prevent any accidents in the future. A tidy workspace not only looks better but also promotes safety for any future maintenance work you might undertake.

🙌 Maintain Beauty and Functionality with Secured Roofing and Restorations
Tile roof repair doesn’t have to be overwhelming. With the right knowledge and tools, you can easily repair your roof and maintain its beauty and functionality. Regular maintenance and prompt repairs will ensure your tile roof lasts for years to come.
At Secured Roofing and Restorations, we understand the importance of a well-maintained roof. Our team of experts is here to help you with all your roofing needs. Whether you need a simple repair or a complete roof replacement, you can trust us to get the job done right. Contact us today to learn more about our services and how we can help you keep your home secure and your family safe.
10 Popular House And Roof Color Combinations (2024)
Written by : Secured Roofing and Restorations
11 minutes read
Choosing the perfect house and roof color combinations isn’t just about aesthetics; it’s also about enhancing your home’s curb appeal, value, and overall harmony. With so many options out there, making the right choice can be daunting. But don’t worry! This guide will walk you through the best combinations for 2024, ensuring your home stands out in the best way possible, including:
- How to Use Color to Highlight Features
- The Role of Texture and Material
- Eco-Friendly and Sustainable Options
- 10 Popular House And Roof Color Combinations
- Mistakes to Avoid When Choosing Colors
🎨 How to Use Color to Highlight Features
Strategically using color can highlight architectural features and add depth to your home’s exterior. For instance, using a different color for trim can make windows and doors pop.
Accentuate Windows and Doors: Choose a contrasting color for window frames and doors to create striking focal points. This approach not only enhances the overall aesthetics but also injects personality and charm into your home’s design, making these elements stand out beautifully against the main color.
Highlight Architectural Details: Architectural features such as gables, columns, and railings can be accentuated with complementary colors. By applying a well-chosen hue, you can bring out the intricacies of these elements, adding dimension and visual interest that draws the eye and showcases the craftsmanship of your home.
Create Visual Balance: Use color strategically to establish balance within your home’s proportions. Darker shades can help large sections recede, creating a sense of depth, while lighter colors can bring forward specific elements, creating a harmonious and cohesive look that enhances the overall appeal of your exterior.
👉 The Role of Texture and Material
The texture and material of your roof and walls can also influence color choices. For example, a textured roof material like shingles may look different in certain colors compared to a smoother metal roof.
Shingles vs. Metal Roofs
Shingles offer versatility in both style and color, making them a popular choice for homeowners seeking a traditional aesthetic. Their texture can influence how light interacts with the surface, affecting the overall appearance of paint colors. Metal roofs, with their sleek finishes, can create a striking contrast with bright or bold colors, allowing for more contemporary looks that stand out against the environment.
Stucco vs. Brick Walls
Stucco walls, with their smooth, textured surface, naturally complement earthy tones, creating a harmonious look that blends well with nature. The texture of stucco can soften the impact of paint colors, making them appear warmer and more inviting. Conversely, brick walls, with their rough texture and natural color variations, benefit from complementary hues that enhance their inherent beauty, creating a balanced and cohesive exterior.
Vinyl Siding
Vinyl siding is a versatile choice, available in various colors and finishes. Its smooth texture allows for vibrant color choices, contributing to a modern appearance that can elevate your home’s curb appeal. Because vinyl is low maintenance and resistant to fading, selecting the right paint colors ensures that the exterior remains vibrant and appealing over time, while the material’s texture can enhance the visual interest of the design.
Enhancing with Trim and Accents
Trim and accent colors play a crucial role in tying together the home’s overall look, as they can either highlight architectural features or create a more unified appearance. The choice of shades for these elements can significantly impact the perception of texture and depth. When selecting paint colors, consider how trim and accents interact with the primary materials, as the right combination can elevate the overall aesthetic of your home.
Matching Colors to Architectural Styles
Your home’s architectural style should guide your color choices. Different styles lend themselves to different palettes:
Colonial Style: Classic colors like white, beige, and muted greens work beautifully with Colonial-style homes. They highlight the symmetrical design and traditional elements.
Mediterranean Style: Warm, earthy tones like terracotta, ochre, and olive green are perfect for Mediterranean homes. These colors enhance the rustic, sun-soaked vibe.
Modern Style: Sleek, minimalist colors such as black, white, and gray are ideal for modern homes. They emphasize clean lines and contemporary design.
🌱 Eco-Friendly and Sustainable Options
In 2024, eco-friendly options are more important than ever. Consider sustainable materials and colors that reflect heat to reduce energy consumption.
Cool Roofs: Cool roofs are designed to reflect more sunlight and absorb less heat, helping to keep buildings cooler in warm weather. By using light-colored or reflective materials, these roofs can significantly reduce energy bills by decreasing the need for air conditioning, making them a smart choice for both comfort and cost savings.
Sustainable Paints: Choosing eco-friendly paints with low VOC (volatile organic compounds) levels is essential for improving indoor air quality and reducing environmental pollution. These paints emit fewer harmful chemicals, making them safer for your health and the planet while still providing a beautiful finish for your home.
Recycled Materials: Utilizing recycled materials for your roof is a sustainable option that reduces waste and conserves resources. These materials, such as recycled shingles or metal, are often durable and require less energy to produce, resulting in a lower environmental impact while still offering long-lasting protection for your home.
🏠 10 Popular House And Roof Color Combinations
Here are some of the most popular house and roof color combinations for 2024:
1. Light Gray House with Dark Gray Roof
This sophisticated combination is both modern and timeless. The light gray exterior exudes a sense of calm and serenity, while the dark gray roof adds depth and structure. This pairing is perfect for urban settings, where clean lines and a muted palette create a chic aesthetic. The versatility of light gray allows for various accent colors, making it easy to personalize your home’s exterior with vibrant door colors or landscaping.
2. Cream House with Dark Brown Roof
The warmth of a cream exterior paired with a rich brown roof is inviting and classic. This combination exudes a sense of comfort and elegance, making it a popular choice for traditional homes. The dark brown roof complements the cream walls beautifully, creating a harmonious look that works well in both suburban neighborhoods and rural settings. Adding wooden accents or charming shutters can enhance the rustic feel, making the home even more inviting.
3. Blue House with White Roof
Fresh and vibrant, a blue house with a white roof is perfect for coastal areas. This cheerful color scheme evokes feelings of tranquility and relaxation, reminiscent of seaside cottages. The white roof not only provides a striking contrast but also reflects sunlight, helping to keep the house cooler in warmer climates. This combination is ideal for beach towns, where adding nautical elements like a rope wreath or seashell decorations can enhance the coastal vibe.
4. Red Brick House with Black Roof
This bold combination makes a statement. The rich texture of red brick paired with a sleek black roof creates a striking visual contrast that is both classic and contemporary. This pairing is often seen in urban areas, where the modern design of the black roof adds an edge to the traditional look of red brick. Accenting with black window frames or a contemporary front door can further unify the design and enhance the home’s curb appeal.
5. Yellow House with Green Roof
Cheerful and unique, a yellow house with a green roof stands out without being overwhelming. This combination is perfect for countryside homes, where it can blend beautifully with the natural surroundings. The bright yellow exterior radiates warmth and happiness, while the green roof offers a refreshing touch that echoes the hues of nature. To enhance this playful color scheme, consider adding vibrant flower boxes or a charming front porch that invites relaxation and enjoyment of the outdoors.
6. White House with Black Roof
This timeless combination offers a clean, sophisticated look that has stood the test of time. The striking contrast between the bright white exterior and the bold black roof creates a visually stunning appearance, making it a favorite choice among homeowners and designers alike. This pairing not only enhances the architectural features of the home but also provides versatility, allowing it to complement various landscaping styles and surroundings. Whether situated in a suburban neighborhood or a rural setting, this classic color scheme attracts attention and admiration while maintaining a sense of elegance.
7. Beige House with Brown Roof
A beige house paired with a brown roof radiates a warm, inviting feel that encourages a sense of comfort and relaxation. This combination is particularly effective for homes nestled in natural surroundings, as it harmonizes beautifully with earthy tones found in nature such as trees and soil. The soft beige provides a neutral backdrop, while the rich brown adds depth and character. This color scheme works well in various architectural styles, from traditional to craftsman, and creates a welcoming atmosphere that feels like home. Adding natural elements like wooden accents or stone pathways can further enhance this warm aesthetic.
8. Gray House with Blue Roof
The pairing of gray and blue is a versatile combination that exudes modernity and calmness. Gray serves as a sophisticated base that complements a range of styles, while the blue roof adds a refreshing pop of color, reminiscent of serene skies and tranquil waters. This combination is ideal for contemporary homes that seek to make a statement without being overly bold. It allows homeowners to embrace a minimalist yet stylish approach, and can be further enhanced with complementary landscaping, such as greenery or colorful flowers, creating a peaceful and inviting atmosphere.
9. Charcoal House with Metallic Roof
This edgy combination is perfect for urban settings, where creativity and innovation often reign supreme. The sleek charcoal exterior provides a dramatic canvas, while the metallic roof adds a futuristic touch that stands out against the city skyline. This bold pairing not only showcases a modern aesthetic but also reflects a sense of individuality and style. The use of metallic materials can create striking reflections and shadows, enhancing the architectural features of the home. To complete the look, consider incorporating industrial-style elements and landscaping that complements the contemporary vibe.
10. Olive Green House with Terra Cotta Roof
This earthy pairing brings a touch of nature to your home, creating a unique yet subtle way to make your house stand out. The olive green exterior evokes a sense of tranquility and connection to the environment, while the warm terra cotta roof adds a rustic charm that is reminiscent of Mediterranean architecture. This combination is ideal for homes surrounded by greenery, as it can blend seamlessly with the natural landscape. To enhance this aesthetic, consider adding wooden features, terracotta planters, or natural stone elements that echo the colors of the roof and provide a cohesive look that celebrates both comfort and style.
🚫 Mistakes to Avoid When Choosing Colors

Choosing the wrong color combination can detract from your home’s appeal. Here are common mistakes to avoid:
Ignoring the Environment
Neglecting the natural surroundings when selecting colors can lead to a jarring aesthetic that clashes with the landscape. It’s essential to consider elements like local flora, terrain, and the styles of neighboring homes. A harmonious palette that blends well with the environment not only enhances your property but also contributes positively to the community aesthetic.
Overlooking the Roof
The roof plays a significant role in the overall visual appeal of a home. Choosing a color that clashes with the roof can create an unbalanced look. It’s crucial to ensure that the roof color complements the exterior hues of your house, creating a cohesive and inviting appearance. Consider the materials and shades of your roof when making color selections for the walls and trim.
Following Trends Blindly
Staying updated on design trends can be beneficial, but blindly following them may lead to choices that quickly feel outdated. It’s vital to select colors that resonate with your personal style and will remain appealing over time. Opt for timeless shades that reflect your personality, ensuring your home remains a true expression of you, rather than just a passing trend.
🙌 Transform Your Home with Perfect Roof Color Combinations
Selecting the perfect house and roof color combinations can transform your home, enhancing its curb appeal and value. By understanding color psychology, considering the environment, and seeking professional guidance, you can create a stunning exterior that reflects your personal style.
At Secured Roofing and Restorations, we specialize in helping homeowners find the perfect color combinations for their roofs. Our team’s expertise and commitment to quality make us the trusted choice for all your roofing needs. Ready to transform your home? Get in touch with us today and discover how we can help you achieve your dream look.
The Top 7 Roof Sealants For Roof Repairs? (2024)
Written by : Secured Roofing and Restorations
8 minutes read
Maintaining the integrity of your roof is crucial for the safety and longevity of your home. One effective way to protect and repair your roof is by using a roof sealant. In this post, we will explore the top roof sealants for roof repairs in 2024, providing homeowners with valuable insights, practical tips, and examples to help you make an informed decision, including:
- Benefits of using roof sealants
- Top 7 roof sealants for various roofing materials
- Maintenance tips for sealed roofs
- Frequently asked questions
✅ Benefits of Using Roof Sealants
Roof sealants offer several benefits that contribute to the overall health and longevity of your roof.
- Enhanced Waterproofing: One of the primary functions of roof sealants is to provide a waterproof barrier. This prevents water from seeping into your roof structure, which can cause significant damage over time.
- UV Protection: Roof sealants can also protect your roof from harmful UV rays. This reduces the risk of cracking and degradation, especially in regions with intense sunlight.
- Prolonged Roof Life: By applying a roof sealant, you can extend the lifespan of your roof. Sealants help maintain the roof’s structural integrity, reducing the need for frequent repairs.
- Energy Efficiency: Roof sealants can improve energy efficiency by reflecting sunlight, keeping your home cooler in hot weather and reducing air conditioning costs.
- Mold and Mildew Prevention: Applying roof sealants helps prevent the growth of mold and mildew by creating a barrier against moisture, ensuring a healthier living environment.
Roof Sealants for Various Roofing Materials
Different roofing materials require specific sealants to achieve the best results. Here are the top roof sealants for different types of roofs.
Metal Roofs: For metal roofs, silicone sealants are the best choice due to their flexibility and resistance to temperature fluctuations.
Asphalt Shingles: Acrylic sealants work well with asphalt shingles, providing excellent UV protection and easy application.
Flat Roofs: Polyurethane sealants are ideal for flat roofs, offering strong adhesion and durability to withstand pooling water.
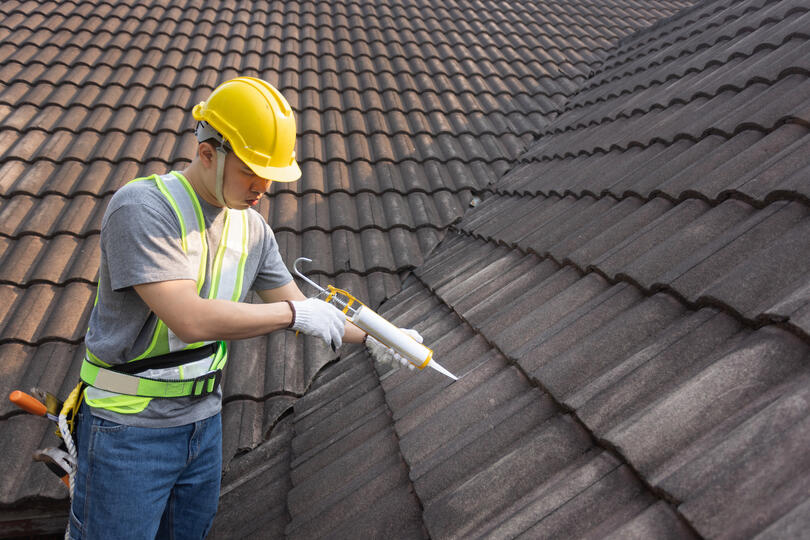
👉 The Top 7 Roof Sealants For Roof Repairs
Choosing the right roof sealant is crucial for ensuring effective repairs and protecting your home from leaks and damage. The top sealants can enhance the longevity of your roof and maintain its integrity against the elements.
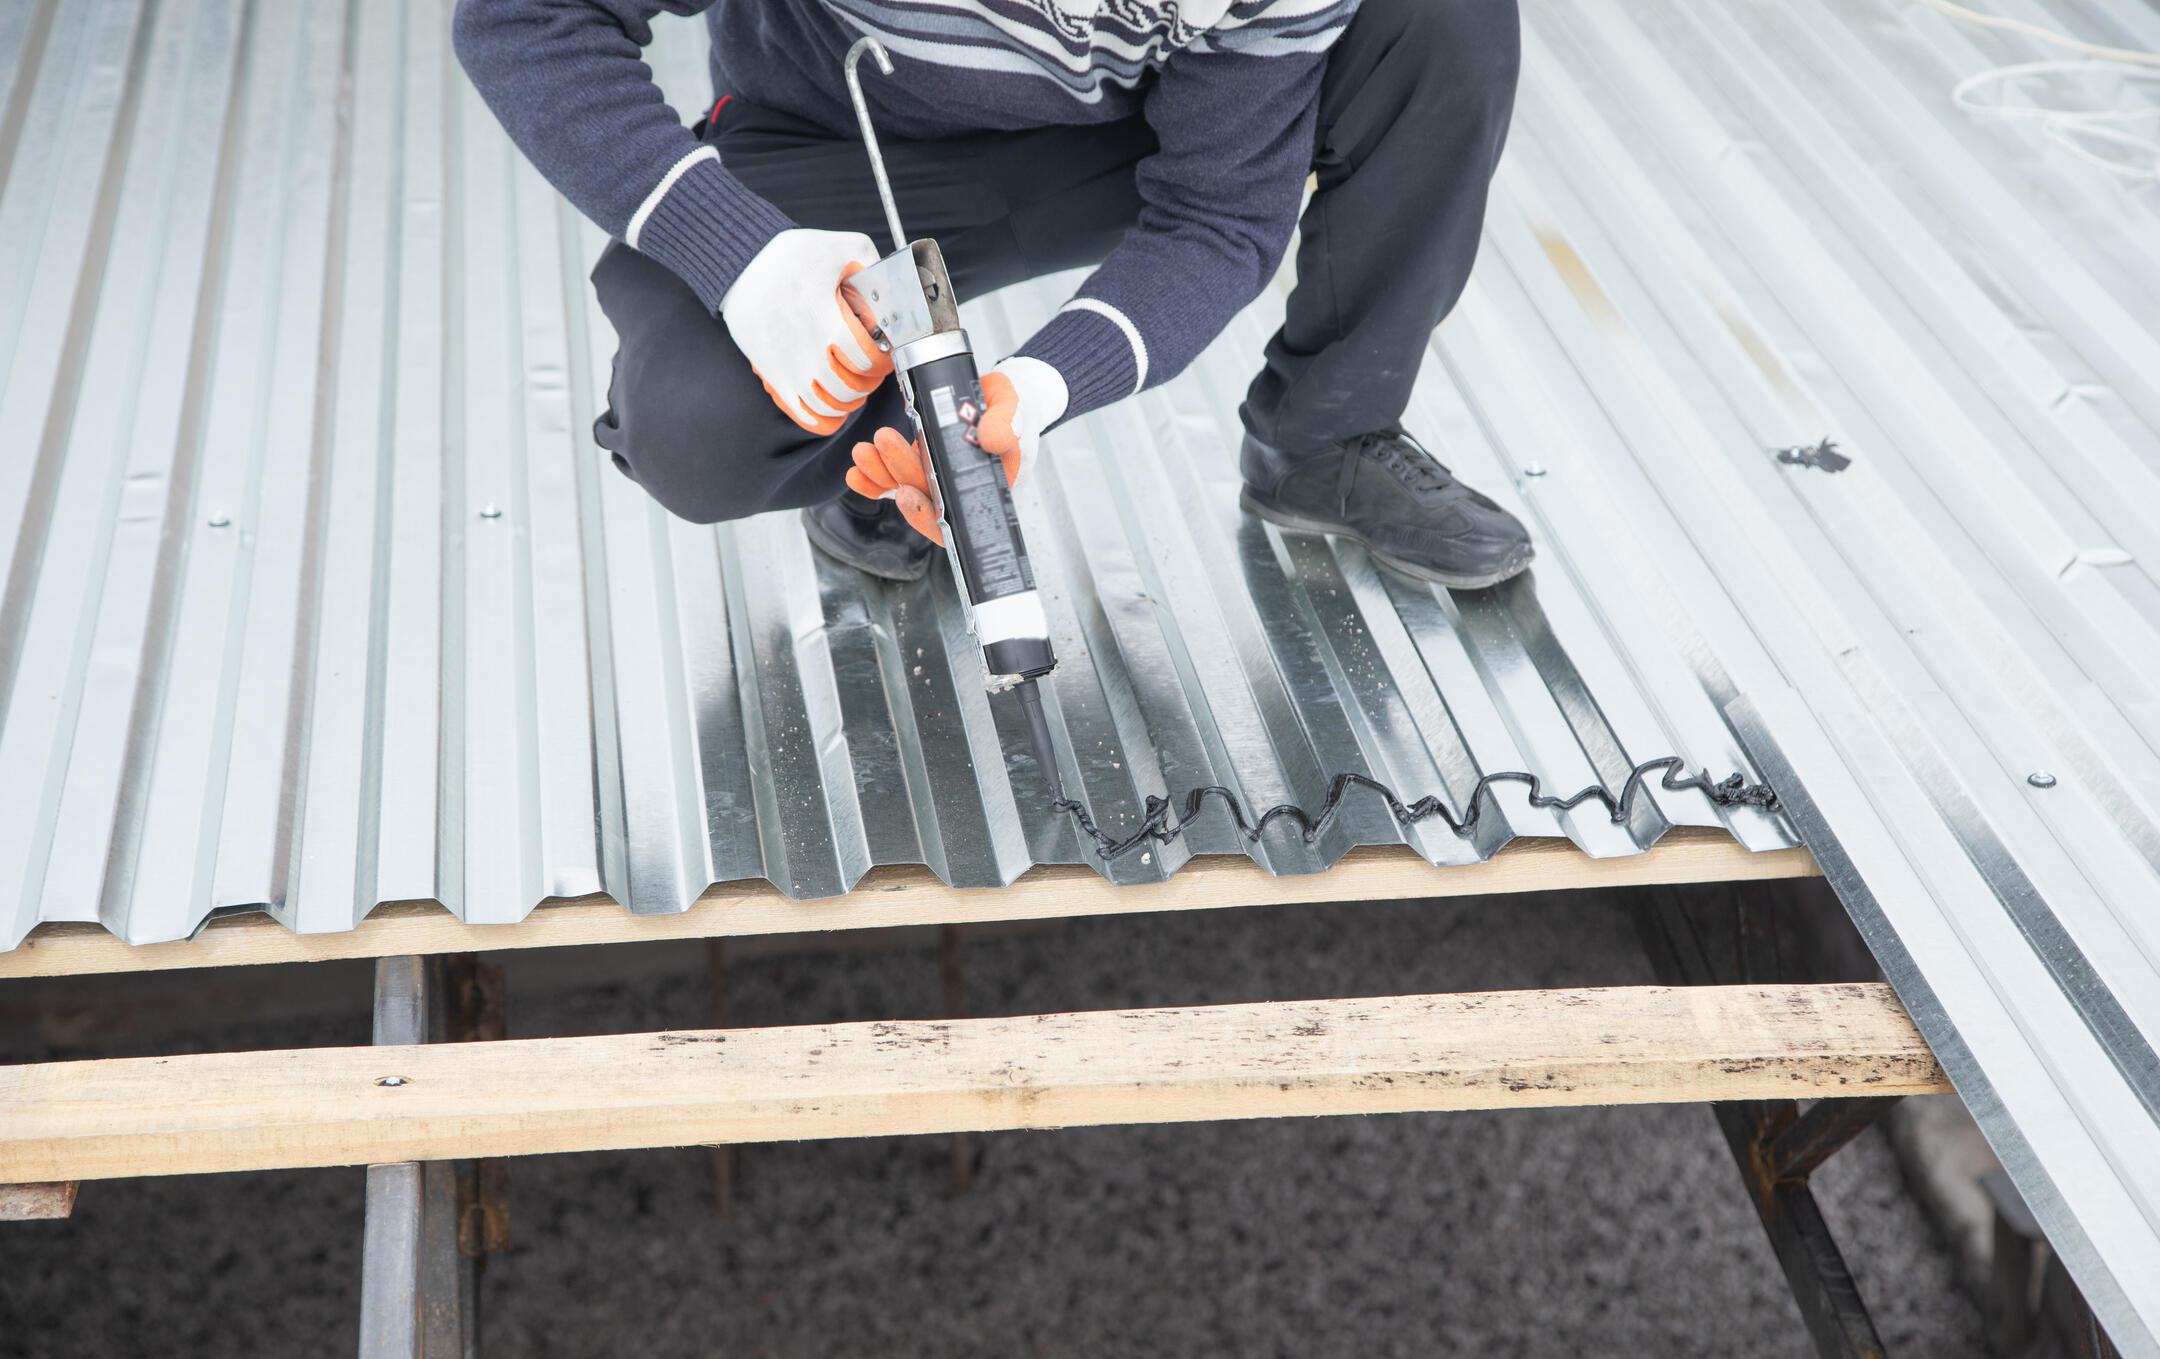
1. Silicone Sealants
Silicone sealants are known for their exceptional durability and weather resistance, making them a top choice for flat roofs and areas susceptible to water pooling. They can withstand extreme temperatures and harsh environmental conditions, ensuring that your roof remains sealed against leaks and moisture for years. Additionally, silicone sealants maintain flexibility over time, preventing cracking and providing a long-lasting solution for any roofing project.
2. Acrylic Sealants
Acrylic sealants are celebrated for their UV resistance and flexibility, which makes them perfect for sloped roofs. Their ease of application allows both professionals and DIY enthusiasts to achieve a seamless finish. These sealants are also paintable, which means they can blend well with the existing roof color, enhancing aesthetics while providing reliable protection. Furthermore, acrylic sealants are water-based, making them a more eco-friendly option without compromising performance.
3. Polyurethane Sealants
Polyurethane sealants offer robust adhesion, making them an excellent choice for bonding to a variety of roofing materials, including metal, concrete, and asphalt. Their versatility ensures that they can be used in different applications, from sealing joints to repairing cracks. Polyurethane sealants also have impressive elasticity, enabling them to accommodate roof movement and thermal expansion without losing effectiveness, which is vital for maintaining a watertight seal.
4. Rubberized Asphalt Sealants
With their outstanding waterproofing capabilities, rubberized asphalt sealants are ideal for repairing and sealing roof leaks. These sealants form a thick, flexible membrane that protects against water infiltration, making them perfect for areas that experience heavy rain or snow. Their ability to adhere to multiple surfaces and create a strong bond ensures a reliable repair that can withstand the test of time. Additionally, rubberized asphalt sealants can be applied in various temperatures, increasing their usability throughout the year.
5. Elastomeric Sealants
Elastomeric sealants are particularly well-suited for commercial roofing applications, thanks to their ability to expand and contract with temperature fluctuations. This flexibility guarantees long-lasting protection against the elements, reducing the risk of cracking or peeling over time. Ideal for flat and low-slope roofs, elastomeric sealants create a durable, waterproof barrier that safeguards the underlying materials. Their application is straightforward, and they provide excellent adhesion, ensuring a secure seal that can withstand various weather conditions.
6. Bitumen Sealants
Bitumen sealants are highly effective for flat roofs, often used in conjunction with roofing felt or membrane systems to create a robust waterproof barrier. These sealants offer excellent adhesion and can withstand temperature changes while remaining flexible. Their durability makes them a popular choice for both new roofing projects and repairs, as they help to extend the lifespan of the roofing system. Bitumen sealants are also resistant to UV rays, ensuring that they maintain their integrity over time.
7. Water-Based Sealants
Water-based sealants are an environmentally friendly option that’s easy to apply, making them an excellent choice for residential roofing projects where minimal environmental impact is preferred. These sealants provide decent durability and are suitable for various applications, from sealing small leaks to protecting against moisture infiltration. Their low VOC content ensures a healthier application process, and they can typically be cleaned up with soap and water. Water-based sealants are ideal for homeowners looking for an efficient and eco-conscious solution to their roofing needs.
💡 Maintenance Tips for Sealed Roofs
Regular maintenance is key to prolonging the life of your sealed roof. Here are some tips to keep your roof in top condition.
- Regular Inspections: Conduct regular inspections to identify any signs of wear or damage. Address issues promptly to prevent further deterioration.
- Clean Gutters: Keep your gutters clean to prevent water buildup and ensure proper drainage. Clogged gutters can lead to water pooling on your roof, causing damage.
- Reapply Sealant as Needed: Over time, sealants may degrade and lose their effectiveness. Reapply sealant as needed to maintain optimal protection.
- Trim Overhanging Branches: Keep trees trimmed to prevent branches from rubbing against your roof or falling on it during storms. This helps avoid damage and reduces debris buildup.
- Monitor for Moss and Algae: Check for moss or algae growth, as these can trap moisture and lead to roof damage. If you notice any, use a gentle cleaner to remove it and prevent future growth.
Common Mistakes to Avoid When Using Roof Sealants
Avoid these common mistakes to ensure the effectiveness of your roof sealant application.
Inadequate Surface Preparation: Proper surface preparation is crucial for ensuring a strong bond between the roof and the sealant. Neglecting to clean away dirt, debris, or old sealants can create barriers that prevent effective adhesion. This can lead to leaks and require more frequent repairs, ultimately increasing maintenance costs.
Over-Application: While it may seem beneficial to apply more sealant for better coverage, over-application can backfire. It can create thick layers that take longer to dry and may not cure properly, leading to a sticky surface that attracts dirt and debris. Always adhere to the manufacturer’s guidelines to ensure optimal results and avoid unnecessary waste.
Ignoring Weather Conditions: Weather plays a significant role in the effectiveness of sealants. Applying sealant during rainy or excessively hot conditions can hinder its ability to adhere properly and cure effectively. It’s best to choose a dry day with moderate temperatures to ensure that the sealant performs as intended, providing long-lasting protection for your roof.
❓ Frequently Asked Questions
Here are some common questions homeowners have about roof sealants.
Q: How Long Does Roof Sealant Last?
The lifespan of roof sealants varies depending on the type and quality of the product. On average, sealants can last between 5 to 10 years.
Q: Can Roof Sealant Be Applied in Cold Weather?
Some sealants can be applied in colder temperatures, but it’s generally best to apply them in moderate weather conditions for optimal results.
Q: Is Roof Sealant Environmentally Friendly?
Many roof sealants are formulated to be environmentally friendly. Look for products labeled as low-VOC or water-based for eco-friendly options.
🙌 Trust Secured Roofing and Restorations for Your Roofing Needs
Choosing the right roof sealant is crucial for maintaining the integrity and longevity of your roof. By understanding the different types of sealants, their benefits, and proper application techniques, you can ensure your roof remains in top condition for years to come.
At Secured Roofing and Restorations, we pride ourselves on providing expert roofing services you can trust. Whether you’re dealing with storm damage, needing a roof replacement, or simply looking to rejuvenate your existing roof, our team is here to help. Our commitment to quality and customer satisfaction makes us the number one choice for homeowners in Central Florida.
Ready to secure your roof? Contact us today and discover why Secured Roofing and Restorations is the team you can rely on for all your roofing needs.
Will Missing Shingles Cause Roof Leaks? (Signs, Fixes…)
Written by : Secured Roofing and Restorations
7 minutes read
Finding shingles scattered across your yard after a storm can be alarming. You might wonder if the absence of a few shingles is a minor issue or a harbinger of roof leaks and water damage. In this blog post, we will explore the impact of missing shingles on your roof, how to identify the signs, and what actions you can take to fix the problem. Here’s what we’ll cover:
- What Are Missing Shingles?
- Impact on Roof Integrity
- 9 Signs Your Roof is Missing Shingles
- What to Do If You Find Missing Shingles
🤔 What Are Missing Shingles?

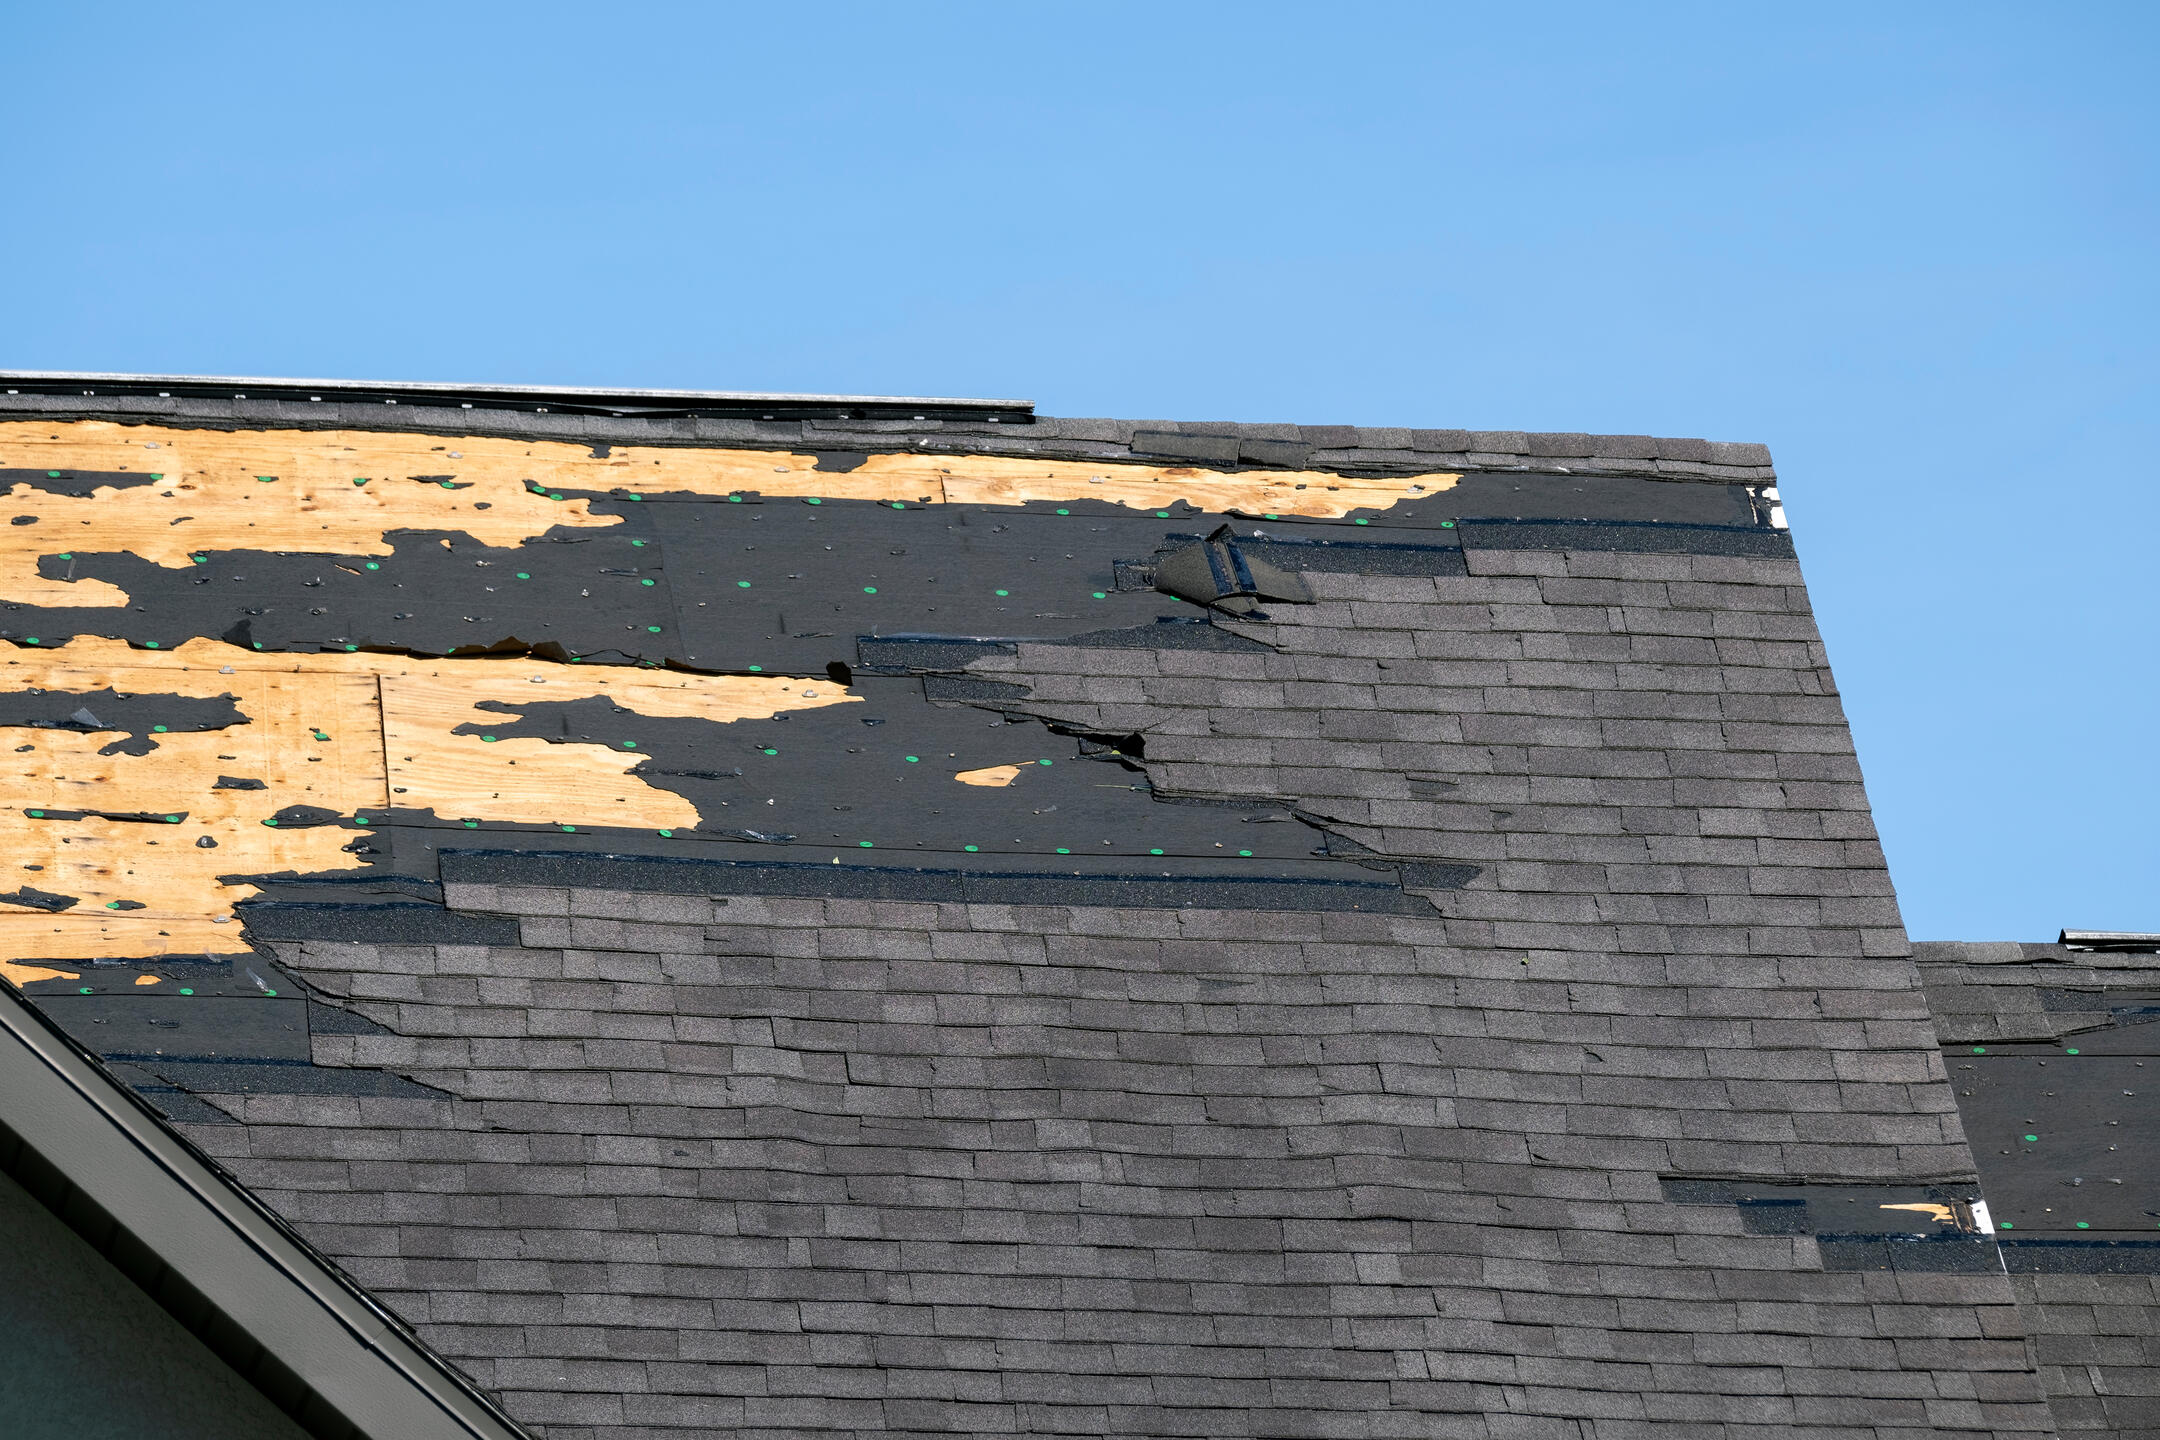
Missing shingles refer to those roofing materials that have become detached from your roof surface. This detachment can occur due to a variety of factors, such as extreme weather events, the natural aging process of the materials, or improper installation practices. When shingles are missing, the protective underlayment and decking of your roof are exposed to environmental elements like rain, snow, and sunlight, which can lead to significant and costly damage over time.
Why Do Shingles Go Missing?
There are multiple reasons why shingles may go missing from your roof. Severe weather conditions, including storms, high winds, and hail, can physically remove shingles or loosen them, causing them to detach. Additionally, the natural wear and tear that occurs as shingles age can weaken their adherence. Poor installation techniques, which can fail to secure shingles properly, and even wildlife activity—such as birds or squirrels—can also result in shingles being pulled off or damaged.
The Importance of Shingles
Shingles play a critical role as the first line of defense for your roof. They serve to protect the underlying layers, including the underlayment and decking, from moisture intrusion, harmful UV rays, and physical damage from debris. When shingles are intact, they help maintain the roof’s integrity, preventing leaks and the growth of mold. If shingles are missing, it significantly increases the risk of water damage and structural issues, making it vital to address any missing shingles immediately to ensure the longevity and safety of your home.
⏳ Impact on Roof Integrity
Short-term vs. Long-term Effects
In the short term, missing shingles might not seem like a big deal, but they can quickly lead to more significant issues. Water can seep into the exposed areas, leading to leaks and water damage inside your home. Over time, this can compromise the structural integrity of your roof, resulting in costly repairs or even a full roof replacement.
How to Inspect Your Roof
Regular roof inspections can help you spot missing shingles before they cause major problems. Use binoculars to scan your roof from the ground or climb up safely to get a closer look. Look for bare spots, curled shingles, and areas where the granules seem to be missing.
⚠️ 9 Signs Your Roof is Missing Shingles

It’s essential to recognize the signs that indicate missing shingles. Here are the top signs to watch for:
1. Visible Gaps
One of the most obvious signs that your roof is missing shingles is the presence of noticeable gaps where shingles used to be. These gaps can allow water, debris, and pests to enter your home, increasing the risk of further damage. If you can see bare patches on your roof, it’s essential to address this issue promptly to prevent leaks and structural damage.
2. Loose Debris
After a storm, if you find shingles or fragments of shingles scattered in your yard, it may indicate that your roof has experienced damage. Loose debris can be a telltale sign that your shingles have become dislodged, which can expose your roof to the elements and lead to more significant issues if not repaired quickly.
3. Water Stains
Water stains on your ceilings or walls are a clear indicator of a leak, which could be caused by missing shingles. These stains often appear as dark patches and can lead to mold growth and structural damage if not addressed. If you notice these stains, it’s crucial to investigate your roof for any signs of missing shingles that could allow water to seep in.
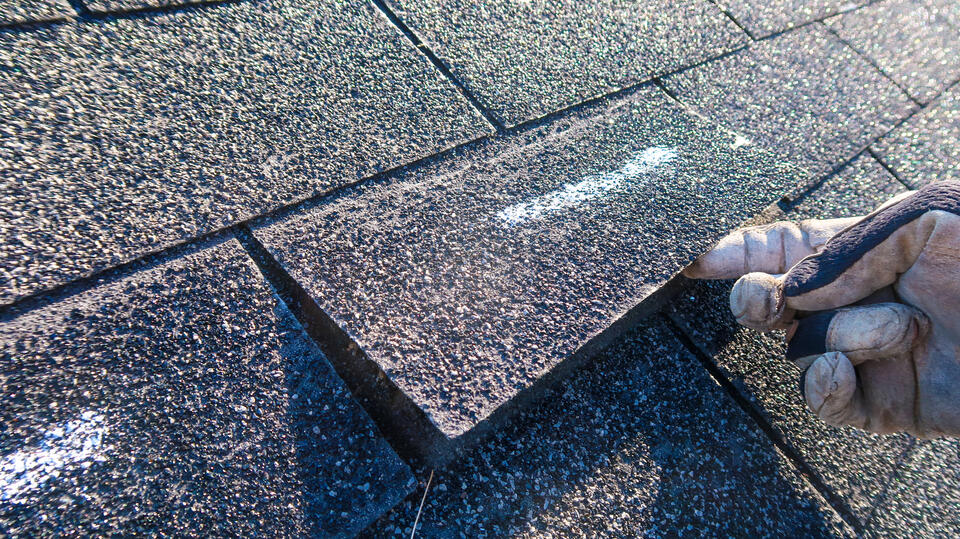
4. Granules in Gutters
If you notice an accumulation of shingle granules in your gutters or downspouts, it may signal that your shingles are deteriorating. Granules help protect shingles from UV rays and other elements, and their loss can lead to further degradation of your roof. Regularly checking your gutters for these granules can help you catch roofing issues early.
5. Bald Spots
Areas on your roof that appear bare or have significantly fewer shingles than the surrounding areas are referred to as bald spots. These spots can be a result of wind damage, wear and tear, or improper installation. Bald spots compromise your roof’s integrity, making it more susceptible to leaks and other damages.
6. Curling or Buckling
Shingles that are curling at the edges or buckling can be a sign that they are nearing the end of their lifespan. This damage can create gaps that allow water to penetrate your roof. Curling and buckling can occur due to extreme weather conditions or improper installation, making it essential to monitor your roof’s condition regularly.
7. Light Through the Roof
If you can see daylight peeking through the roof boards in your attic, this is a clear indication of missing shingles. This situation not only suggests a potential entry point for rain and pests but also indicates that your roof’s protective layer has been compromised. It’s crucial to inspect and repair any areas where light is visible to prevent further damage.
8. Increased Energy Bills
A sudden spike in energy costs may be linked to missing shingles that have compromised your roof’s insulation. When shingles are missing, heat can escape during the winter, and cool air can leave your home in the summer, leading to increased energy bills. If you notice a significant rise in costs, it may be time to check your roof for any missing shingles or other issues.
9. Insect Infestations
Pests entering your home through gaps can signal that you are missing shingles. Insects like ants, termites, and rodents can exploit these weaknesses to invade your living space, leading to potential damage and health concerns. If you notice insect activity, it’s important to check your roof for any signs of missing shingles that could be allowing these pests access to your home.
👨🔧 What to Do If You Find Missing Shingles
Missing shingles can lead to significant roof damage, allowing water to seep in and cause leaks or mold growth. Addressing this issue promptly helps maintain the integrity of your home and prevents costly repairs down the line.
DIY Fixes for Missing Shingles
If you’re a handy homeowner, you might consider fixing missing roof shingles yourself. Start by gathering the necessary tools and materials, including replacement shingles, roofing nails, and a hammer. Carefully remove any damaged shingles and install the new ones, ensuring they align with the existing shingles.
When to Call a Professional
While minor fixes can be handled solo, it’s advisable to call a professional for more extensive repairs. Roofing professionals have the expertise to assess the extent of the damage and provide long-lasting solutions. They can also spot potential issues that an untrained eye might miss.
Preventative Measures
Prevention is always better than cure. Regular maintenance and inspections can help you identify and fix potential problems before they escalate. Consider scheduling annual inspections with a professional roofing company to keep your roof in top condition.
🙌 Trust Secured Roofing and Restorations for Expert Services
Missing shingles might seem like a minor inconvenience, but they can lead to significant problems if not addressed promptly. Regular inspections, timely repairs, and preventative maintenance are crucial to keeping your roof in top shape. If you’re in Central Florida and need expert roofing services, Secured Roofing and Restorations is the team you can trust. Contact us today to schedule an inspection and keep your home safe and secure.
Storm Damage Roof Inspection: What To Expect?
Written by : Secured Roofing and Restorations
7 minutes read
When storm clouds gather, the worry about potential damage to your home can be overwhelming. For homeowners, one of the most critical concerns is the roof. It’s your first line of defense against the elements, so ensuring it’s in top condition is essential. This comprehensive guide will walk you through the essentials of storm damage roof inspections, including:
- Understanding the importance of a storm damage roof inspection
- Recognizing signs of roof damage
- What to do if you find damage
- How Secured Roofing and Restorations can help
🤔 Why a Storm Damage Roof Inspection is Crucial
Taking the time to inspect your roof after a storm can save you from costly repairs down the line. Storms can cause hidden damage that, if left unchecked, can lead to leaks, structural issues, and even mold growth.
- Preventing Further Damage: One of the primary reasons to inspect your roof after a storm is to prevent further damage. Small issues can quickly escalate into major problems if not addressed promptly.
- Protecting Your Investment: Your home is likely your most significant investment. Regular inspections help protect this investment by ensuring that any damage is identified and repaired quickly.
- Ensuring Safety: A damaged roof can pose a significant safety risk. Loose shingles or structural damage can lead to accidents. An inspection ensures that any hazards are identified and fixed.
The Inspection Process
A thorough storm damage roof inspection involves several key steps. Understanding this process can help you know what to expect.
Initial Assessment
Begin with a thorough visual inspection from the ground level. Look for obvious signs of damage, such as missing shingles, visible holes, or any sagging areas that may indicate underlying issues. This initial check helps identify potential problems without needing to access the roof directly.
Closer Examination
For a more comprehensive assessment, it’s important to get on the roof if you feel safe doing so. Carefully inspect the surface for any signs of damage, such as cracked or curled shingles, rusted flashing, or leaks. If you’re unsure or uncomfortable, it’s wise to hire a professional who has the experience and safety equipment to conduct a detailed inspection.
Documenting Damage
Capture photos of any damage you encounter during your inspection. This documentation is not only useful for your records but can also be crucial when filing an insurance claim. Clear images will help your insurance company understand the extent of the damage and speed up the claims process.
💡 9 Things You Might Find From a Storm Damage Roof Inspection
During your inspection, you might find various types of damage. Here are some common issues to look out for.
1. Shingle Damage
After a storm, it’s common to find shingles that are missing, cracked, or curled. These problems not only detract from the roof’s aesthetic appeal but can also create vulnerabilities that allow water to seep in, resulting in further damage to the underlying structure. Regularly inspecting shingles and replacing any that are compromised can help maintain the integrity of your roof.
2. Gutter Problems
Gutters play a crucial role in directing rainwater away from your home. Storms can lead to clogged or damaged gutters due to falling debris, such as branches and leaves. It’s important to regularly check for debris build-up, as this can cause overflowing gutters that may damage your siding or foundation. Additionally, ensure that gutters are securely attached; loose gutters can lead to serious water damage.
3. Flashing Issues
Flashing is vital for preventing leaks around chimneys, vents, and other roof penetrations. After severe weather, check to see if the flashing is loose, damaged, or missing. Compromised flashing can allow water to seep into your home, leading to leaks and significant water damage. Proper sealing and installation are essential for ensuring that flashing functions effectively.
4. Roof Leaks
One of the most concerning issues that can arise after a storm is roof leaks. Water stains on ceilings or walls are telltale signs of potential leaks in the roof. It’s important to inspect the interior of your home for any signs of moisture, such as discolored patches or peeling paint. Promptly addressing leaks can prevent further damage to your home and save you from costly repairs down the line.
5. Structural Damage
The framework of your roof must be in good condition to support the roofing materials and withstand harsh weather. After a storm, check for any sagging or warping in the roof’s structure, as these can indicate serious underlying issues that require immediate attention. Neglecting structural damage can lead to more extensive repairs and compromise the safety of your home.
6. Missing or Damaged Roof Tiles
In addition to inspecting shingles, take the time to look for any missing or damaged roof tiles. Tiles can become dislodged or broken due to high winds or falling debris, compromising the overall integrity of the roof. Replacing damaged tiles not only enhances the roof’s appearance but also protects your home from water ingress.
7. Damage to Ventilation Systems
Proper ventilation is key to maintaining a healthy attic environment. Storms can disrupt roof ventilation systems, leading to poor airflow, which can create conditions ripe for mold growth. Check that vents are clear of debris and functioning properly, as this will help prevent moisture build-up and potential health hazards in your home.
8. Debris Accumulation
Following a storm, it’s important to check for any debris that may have accumulated on your roof, such as branches, leaves, or other materials. This debris can trap moisture on the roof’s surface, increasing the risk of damage over time. Regularly clearing debris not only improves drainage but also helps preserve the lifespan of your roof.
9. Ice Dams
For homeowners in colder climates, the formation of ice dams at the edges of the roof can be a significant concern. Ice dams occur when melting snow refreezes at the roof’s edge, causing water to back up under shingles and potentially leading to leaks. To prevent ice dams, ensure proper insulation and ventilation in the attic to maintain a consistent temperature on the roof. Regularly removing snow build-up can also help mitigate this risk.
👉 What to Do If You Find Damage
If you discover damage during your inspection, it’s essential to take immediate action to prevent further issues.
Temporary Repairs
If possible, make temporary repairs to prevent more damage. This might include covering holes with tarps or sealing leaks with roofing tape.
Contacting a Professional
For significant damage, it’s best to contact a professional roofing contractor. They have the expertise and equipment to perform repairs safely and effectively.
Filing an Insurance Claim
Document all damage and contact your insurance company to file a claim. They will guide you through the process and send an adjuster to assess the damage.
👨🔧 The Role of Professional Roofers
Professional roofing contractors play a crucial role in storm damage repair. They have the skills and experience to identify and fix issues that you might miss.
Experience and Expertise
Professional roofers have the knowledge to assess damage accurately and recommend the best course of action. They can identify issues that may not be apparent to the untrained eye.
Safety Considerations
Roofing work can be dangerous. Professionals have the necessary safety equipment and training to perform repairs safely.
Quality Repairs
Hiring a professional ensures that repairs are done correctly and to a high standard. This can extend the lifespan of your roof and prevent future problems.
🙌 Protect Your Home with Storm Damage Roof Inspections
A storm damage roof inspection is an essential step in protecting your home and ensuring its longevity. By understanding what to look for and taking prompt action, you can prevent further damage and keep your roof in top condition.
At Secured Roofing and Restorations, we’re here to help. With our expertise, customer-focused approach, and commitment to quality, you can trust us with all your roofing needs. Don’t wait until it’s too late—contact us today to schedule your storm damage roof inspection and keep your home secure.
5 Expert Tips For Chimney Flashing Repair
Written by : Secured Roofing and Restorations
9 minutes read

Repairing chimney flashing is crucial for maintaining the integrity of your home’s roof. By ensuring that your chimney is properly flashed, you can prevent leaks, water damage, and other costly issues. This guide will walk you through everything you need to know about chimney flashing repair, from understanding what it is to identifying when it needs attention and providing expert tips for a successful repair, including:
- The basics of chimney flashing
- Common signs of damage
- Preventative measures
- Step-by-step repair instructions
- 5 expert tips for a lasting fix
🤔 What is Chimney Flashing?
Chimney flashing is a material, usually made of metal like aluminum or galvanized steel, that creates a waterproof seal between the chimney and the roof. It’s an essential part of the roofing system that prevents water from seeping into your home. Properly installed flashing directs water away from the chimney structure and into the gutters.
Types of Chimney Flashing
There are two primary types of chimney flashing:
- Step Flashing: Installed in layers, step flashing is used where the chimney meets the roof. Each piece overlaps the next, creating a stair-step pattern.
- Counter Flashing: Installed on the chimney itself, counter flashing covers the top edge of the step flashing.
Both types work together to form a watertight barrier.
Importance of Chimney Flashing
Chimney flashing plays a crucial role in protecting your home from water damage. Without effective flashing, rainwater can seep into the chimney and surrounding areas, potentially causing mold growth, wood rot, and serious structural issues. This can compromise the integrity of your home and lead to costly repairs. Regular inspection and maintenance of your chimney flashing not only helps identify any wear and tear but also ensures a tight seal against the elements, ultimately safeguarding your investment and preserving the comfort of your living space. Taking proactive measures can save you from expensive repairs and enhance your home’s durability.
⚠️ Signs Your Chimney Flashing Needs Repair

Chimney flashing is a crucial component of your roof’s waterproofing system, and neglecting it can lead to serious issues. Recognizing the signs that your chimney flashing needs repair can save you time and money in the long run.
Visible Rust and Corrosion
One of the most obvious signs of damaged metal flashing is rust. If you notice rust or corrosion on the metal flashing, it’s a clear indication that the material is breaking down and you need chimney flashing replacement.
Water Stains and Leaks
Water stains on the ceiling or walls near your chimney are a red flag. These stains indicate that water is penetrating your roof, and the flashing may be the culprit. Leaks can lead to significant damage if not addressed promptly.
Cracked or Missing Flashing
Inspect the area around your chimney. If you see any cracks, gaps, or missing pieces in the flashing, it’s time for a repair. Damaged flashing cannot effectively keep water out, leaving your home vulnerable to leaks.
✋ Preventative Measures
Preventative measures for chimney flashing are essential to ensure the longevity and effectiveness of your chimney’s waterproofing. By regularly inspecting and maintaining the flashing, homeowners can prevent leaks and costly damage caused by water infiltration. Taking proactive steps now can save you time and money in the long run.
Regular Inspections
Regularly inspecting your roof and chimney can help you catch problems early. Aim to inspect your chimney flashing at least twice a year, and after severe weather events.
Proper Installation
Ensure that you install flashing materials correctly. Poor installation can lead to premature failure. Hiring a professional for installation can provide peace of mind and ensure the job is done right.
Using Quality Materials
Quality materials are essential for long-lasting chimney flashing. Opt for durable metals like galvanized steel or aluminum, which can withstand the elements and provide reliable protection.
🛠️ How to Repair Chimney Flashing
Chimney flashing is a crucial component that protects your roof and chimney from water leaks. Over time, it can wear down or become damaged, leading to potential issues in your home.
Gather Your Materials
Before starting your repair, gather the necessary materials:
- Replacement flashing
- Roofing cement
- Caulk gun
- Ladder
- Protective gloves and eyewear
Having everything prepared will make the repair process smoother and more efficient.
Removing Old Flashing
Carefully remove the old, damaged flashing. Use a pry bar to lift the shingles around the chimney and gently pull out the flashing. Be cautious not to damage the surrounding shingles or roofing material.
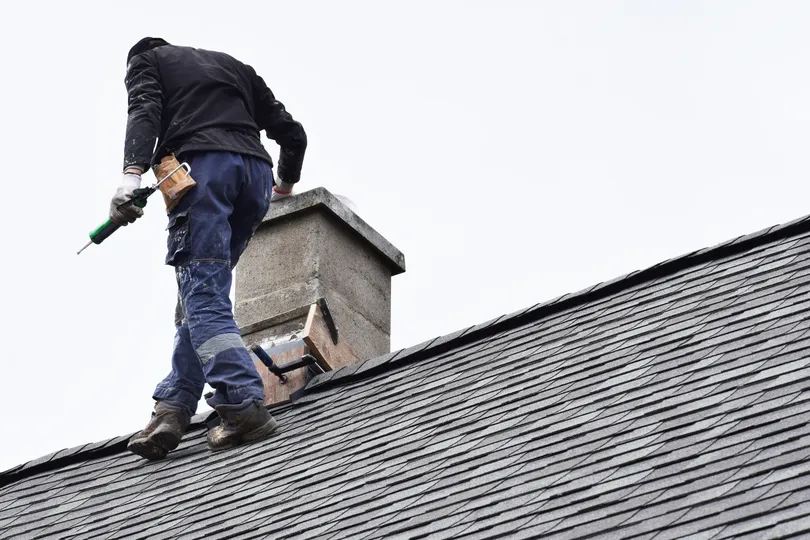
Installing New Flashing
Apply new flashing in layers, starting with step flashing. Secure each piece with roofing nails and cover the nails with roofing cement to prevent leaks. Install counter flashing over the step flashing, sealing the edges with caulking for an added layer of protection.
💡 5 Expert Tips For Chimney Flashing Repair

Chimney flashing repair is a crucial aspect of maintaining the integrity of your roof and preventing water damage. Properly installed and maintained flashing can protect your home from leaks and structural issues. In this section, we’ll share expert tips to help you effectively address any flashing problems and ensure your chimney remains secure and watertight.
1. Safety First
When working on your roof, always prioritize safety above all else. Start by ensuring you have a sturdy ladder that can support your weight and reach the necessary height without wobbling. Wear protective gear, such as a hard hat and non-slip shoes, to guard against accidents. Additionally, make sure to avoid working during extreme weather conditions like rain, high winds, or storms, as these can increase the risk of slips and falls. It’s also advisable to have a buddy system in place—having someone nearby can make a significant difference in case of an emergency.
2. Measure and Cut Precisely
Accurate measurements and cuts are crucial for effective flashing installation. Begin by measuring the area where the flashing will be placed, taking care to account for any angles or curves. Use a chalk line to mark your cuts, ensuring they are straight and precise. A sharp utility knife or metal snips can help achieve clean edges. Remember, the goal is for each piece of flashing to fit snugly against the roofing material, as this will provide the best barrier against water infiltration. Double-check your measurements before cutting to minimize waste and ensure a perfect fit.
3. Seal Edges Thoroughly
To prevent water from seeping beneath your flashing, apply roofing cement or caulking generously to seal all edges and joints. Start by cleaning the surface where the flashing will be applied to remove any debris or old sealant. After placing the flashing, use a caulking gun to apply a thick bead of roofing cement along the edges, making sure to cover all seams and potential weak spots. It’s important to smooth the sealant afterward for a secure bond. This step is vital for creating a watertight seal, which will protect your roof from water damage over time.
4. Check for Gaps
After installing the new flashing, it’s essential to double-check for any gaps or loose edges that might compromise your repair. Inspect the flashing closely, looking for uneven spots or areas that don’t seem securely attached to the roof. Use a flashlight if necessary to get a better view of hard-to-see areas. Tighten any loose sections by adding additional screws or fasteners as needed, and apply extra sealant in any identified gaps to ensure a complete seal. This thorough inspection can save you from future leaks and extensive repairs.
5. Test for Leaks
Once your repair is complete, it’s crucial to verify that everything is sealed properly by testing for leaks. Use a hose to spray water on the roof around the chimney and flashing area, simulating rainfall. Pay close attention to the interior of your home, checking for any signs of water penetration, such as damp spots or discoloration on ceilings and walls. If you notice any leaks during this test, you may need to revisit your flashing installation and make additional adjustments or sealant applications. Performing this test can provide peace of mind that your repair is effective and long-lasting.
🚫 Common Mistakes to Avoid
When it comes to chimney flashing, avoiding common mistakes is crucial for ensuring a watertight seal and preventing costly damage. Many homeowners overlook the importance of proper installation and maintenance, leading to leaks and deterioration.
Using Inappropriate Materials
Using materials not designed for chimney flashing can lead to quick deterioration. Always use high-quality, weather-resistant metals.
Skipping the Sealant
Failing to apply roofing cement or caulking can leave your flashing vulnerable to leaks. Sealing all edges and joints is a crucial step in the repair process.
Ignoring Regular Maintenance
Neglecting regular inspections and maintenance can result in unnoticed damage and costly repairs. Stay proactive to extend the lifespan of your chimney flashing.
👨🔧 When to Call a Professional
Knowing when to call a professional for chimney flashing is crucial to ensuring the safety and integrity of your home. If you notice water stains on your ceiling or walls, or if your flashing appears damaged or improperly installed, it’s time to seek expert help. A professional can assess the situation and provide the necessary repairs to prevent further issues.
- Extensive Damage: If your chimney flashing is extensively damaged or you’re unsure about the repair process, it’s best to call in a professional. They have the expertise and tools to handle complex repairs safely.
- Lack of Experience: Roofing work can be dangerous, especially for those without experience. Hiring a professional can provide peace of mind and ensure the job is done correctly.
- Peace of Mind: Professional roofers offer warranties on their work, providing an added layer of protection and peace of mind for homeowners.
🙌 Trust Secured Roofing and Restorations for Your Roofing Needs
Chimney flashing repair is a vital part of home maintenance that shouldn’t be overlooked. By understanding the basics, recognizing the signs of damage, and following expert tips, you can keep your chimney flashing in top condition.
At Secured Roofing and Restorations, we pride ourselves on providing reliable, professional roofing services. Our team of experts is dedicated to helping homeowners maintain their roofs and protect their homes. If you need assistance with chimney flashing repair or any other roofing needs, don’t hesitate to reach out to us.
Secure your home with the team you trust. Contact Secured Roofing and Restorations today!
What Is Roof Decking? (Pros and Cons)
Written by : Secured Roofing and Restorations
9 minutes read

Are you planning a roofing project for your home, whether it’s a new construction or a renovation? Understanding the essential components of a sturdy roof is vital, and one key element to consider is roof decking. In this blog post, we’ll explore what roof decking is and why it plays a crucial role in enhancing the durability and performance of your home. Discover the benefits of roof decking and how it can protect your investment, including:
- What is roof decking?
- Pros and cons of roof decking
- How to choose the right roof decking for your home
- Installation process of roof decking
- Common issues and maintenance tips
- Cost considerations
- When to replace roof decking
❓ What Is Roof Decking?
Roof decking, often referred to as sheathing, serves as the essential layer of material positioned between the structural components of a roof, such as trusses and joists, and the outer roofing materials, which can include shingles or tiles. This critical component not only provides a secure base for waterproofing layers but also ensures that exterior materials are firmly attached, contributing to the overall stability and effectiveness of the roofing system.
Types of Roof Decking Materials
There are several materials used for roof decking, each offering unique benefits and drawbacks that can influence your choice. The most common options include:
- Plywood: Favored for its strength and versatility.
- Oriented Strand Board (OSB): Often chosen for its cost-effectiveness and ease of installation.
- Metal Decking: Particularly valued in commercial applications for its superior strength, durability, and resistance to various environmental factors, making it a long-lasting choice for roofing systems.
The Role of Roof Decking in Your Roofing System
Roof decking is pivotal in maintaining the structural integrity of your roofing system. It serves as a solid foundation for various roofing materials, ensuring they stay securely in place during adverse weather conditions. Furthermore, roof decking acts as a protective barrier against moisture, mitigating the risk of water damage to your home’s interior structure and preserving the longevity of your roof. Proper installation and maintenance of roof decking are essential for achieving optimal performance and protection for your home.
👇 7 Pros and Cons of Roof Decking
Understanding the pros and cons of roof decking can help you make an informed decision when planning your roofing project.
1. Durability ✅
Roof decking materials, such as plywood and oriented strand board (OSB), are celebrated for their strength and longevity. These materials are engineered to withstand various environmental stresses, including heavy rain, snow, and fluctuating temperatures. Their durability ensures that they can support the roofing structure for many years without the need for frequent replacements. This longevity not only protects your investment but also reduces the overall costs associated with roof maintenance over time.
2. Support ✅
Roof decking provides a stable foundation for roofing materials, which is crucial for maintaining the integrity and functionality of the entire roofing system. A solid deck ensures that shingles or other roofing materials remain securely in place, preventing leaks and structural failures. This reliable support is vital during severe weather conditions, where strong winds can compromise the roofing system. By using quality decking, homeowners can have peace of mind knowing their roof is well-supported and fortified.
3. Weather Resistance ✅
One of the significant advantages of roof decking is its ability to protect your home from moisture and related weather damage. High-quality decking materials are designed to resist water infiltration, which can lead to mold, rot, and other forms of deterioration. This weather resistance is particularly important in regions prone to heavy rains or snowfall. By keeping moisture at bay, roof decking ultimately prolongs the lifespan of the roofing system and enhances the overall health of your home.
4. Insulation ✅
Roof decking plays a crucial role in improving the energy efficiency of your home. By providing an additional layer of insulation, it helps regulate indoor temperatures, reducing reliance on heating and cooling systems. This improved insulation can lead to lower energy bills and a more comfortable living environment year-round. Investing in effective roof decking not only benefits your home’s energy efficiency but also contributes to a more sustainable lifestyle by minimizing energy consumption.
5. Cost 🚫
High-quality roof decking materials can be expensive, which is a significant consideration for homeowners and builders alike. While investing in quality materials may lead to better durability and performance, the upfront costs can strain budgets, especially for large roofing projects. Cheaper alternatives might seem appealing initially, but they often lead to higher long-term expenses due to more frequent repairs or replacements. Therefore, the financial impact of selecting premium decking materials should be weighed carefully against the potential benefits of longevity and reduced maintenance.
6. Maintenance 🚫
Roof decking requires regular inspections and maintenance to ensure longevity, which can be a drawback for many property owners. Over time, exposure to the elements can lead to wear and tear, necessitating routine check-ups to identify issues like rot, warping, or water damage. This ongoing commitment to maintenance can be time-consuming and may involve additional costs for repairs or professional inspections. For those looking for a low-maintenance roofing solution, the necessity of constant upkeep can detract from the appeal of roof decking.
7. Installation Time 🚫
Installing roof decking can be time-consuming, potentially extending the duration of your roofing project. Unlike simpler roofing systems, roof decking requires careful measuring, cutting, and fitting to ensure a proper installation. This meticulous process can lead to delays, especially if unexpected issues arise during installation, such as the need for additional repairs or adjustments. For homeowners eager to complete their roofing projects quickly, the extended installation time can be a significant downside, causing frustration and potential disruptions to their living conditions.
🤔 How to Choose the Right Roof Decking for Your Home
Selecting the right roof decking material depends on various factors, including the climate, your budget, and the specific needs of your home. Consulting with a professional roofer can help you make the best choice.
Consider Your Climate
The climate in your area plays a significant role in determining the suitable roof decking material. For instance, in regions with heavy rainfall, water-resistant materials like metal decking might be more appropriate.
Budget Constraints
While high-quality materials offer better durability and performance, they come at a higher cost. Balancing quality with budget constraints is crucial when making your decision.
Professional Advice
Working with a professional roofer can provide valuable insights and recommendations tailored to your specific needs, ensuring you choose the best material for your home.
🛠️ Installation Process of Roof Decking
The installation of roof decking involves several steps to ensure a secure and durable base for your roofing materials.
Preparation
Before installation, it is essential to conduct a thorough inspection of the existing roof. This inspection should identify any damaged components, such as shingles, underlayment, or structural supports. Any issues found must be addressed—damaged areas should be repaired or replaced to ensure they do not compromise the integrity of the new roofing system. This preparatory phase is critical, as it guarantees that the new decking will have a solid and reliable foundation on which to rest. A well-prepared roof will help prevent future problems and extend the lifespan of the new roofing materials.
Installation
Once the preparation is complete, the next step is to lay out the roof decking material. This material must be carefully positioned and secured to the structural components of the roof, such as rafters or trusses. It’s important to follow proper installation techniques, including using the right fasteners and ensuring that all seams are properly aligned. Adequate spacing and ventilation should also be considered during installation to promote airflow and prevent moisture buildup. By adhering to these best practices, you ensure the longevity and performance of the roof, protecting your home from the elements for years to come.
Finishing Touches
After the decking is securely installed, it’s time to add the waterproofing layers and exterior roofing materials. This step is crucial, as it provides an additional layer of protection against rain, snow, and other harsh weather conditions. The waterproofing membrane should be applied carefully to ensure complete coverage, preventing leaks and water damage. Following this, the final roofing materials, such as shingles, tiles, or metal sheets, are installed. This not only completes the roofing system but also enhances the overall aesthetic appeal of the home. Properly executed finishing touches will ensure that the roofing system is not only functional but also visually appealing, giving homeowners peace of mind and added value to their property.
💡 Common Issues and Maintenance Tips
Regular maintenance of your roof decking can prevent common issues and extend its lifespan.
Inspections
Regular inspections can help identify any potential problems early on, allowing for prompt repairs and preventing further damage.
Moisture Control
Ensuring proper ventilation and moisture control can prevent water damage and mold growth, which can compromise the integrity of your roof decking.
Repair and Replacement
Addressing any damage promptly can prevent more extensive repairs and extend the life of your roof decking.
💵 Cost Considerations
The cost of roof decking depends on various factors, including the material used, the size of your roof, and the complexity of the installation.
Material Costs
High-quality materials may come with a higher price tag, but they offer better durability and performance, making them a worthwhile investment.
Labor Costs
Professional installation is essential for ensuring the longevity and performance of your roof decking. Labor costs can vary based on the complexity of the project and the experience of the roofer.
Long-Term Savings
Investing in high-quality roof decking can lead to long-term savings by reducing the need for frequent repairs and improving the energy efficiency of your home.
👉 When to Replace Roof Decking

Knowing when to replace your roof decking is crucial for maintaining the integrity of your roofing system.
Signs of Damage
Visible signs of damage, such as sagging or water stains, indicate that your roof decking may need to be replaced.
Age of the Roof
The age of your roof can also be a factor in determining when to replace the decking. Older roofs may require replacement to ensure continued protection and performance.
Professional Assessment
Consulting with a professional roofer can provide an accurate assessment of the condition of your roof decking and recommendations for replacement if necessary.
🙌 Enhancing Your Roof’s Durability with Secured Roofing and Restorations
At Secured Roofing and Restorations, we understand the importance of a strong and reliable roof. Our team of experienced professionals is dedicated to providing top-quality roofing services, including the installation and maintenance of roof decking. We pride ourselves on our commitment to customer satisfaction and our extensive knowledge of roofing systems.
Ready to enhance the durability and performance of your roof? Contact us today to schedule a consultation and discover why homeowners trust Secured Roofing and Restorations for all their roofing needs.
Roof Inspection Cost: Everything You Need to Know
Written by : Secured Roofing and Restorations
9 minutes read
Owning a home comes with many responsibilities, and maintaining the roof is one of the most important. Regular roof inspections can save you thousands of dollars in repairs and give you peace of mind that your home is safe from the elements. In this blog post, we’ll explore every aspect of roof inspection costs, aiming to provide homeowners like you with all the information needed to make an informed decision, including:
- The Importance of Roof Inspections
- Factors Affecting Roof Inspection Cost
- When Should You Schedule a Roof Inspection?
- 5 Signs You Need a Roof Inspection
- How to Find a Reliable Roof Inspector
- Benefits of Regular Roof Inspections
- FAQs
❗️ The Importance of Roof Inspections
Regular roof inspections are essential for maintaining the integrity of your home. They help identify potential issues before they become major problems, ensuring your roof lasts longer and protects you better.
Roof inspections can detect leaks, structural damage, and other issues that may not be visible from the ground. By catching these problems early, you can prevent costly repairs and extend the lifespan of your roof. Additionally, regular inspections can help you maintain your home’s value and improve energy efficiency.
Neglecting roof inspections can lead to expensive repairs and even complete roof replacements. Therefore, it’s crucial to prioritize roof inspections as part of your home maintenance routine.
🤔 Factors Affecting Roof Inspection Cost
Several factors can influence the cost of a roof inspection, including:
- Roof Size and Complexity: Larger and more complex roofs require additional time and effort for thorough inspections, as inspectors must navigate various features and potential hazards. This increased labor and the need for careful evaluation often lead to higher costs for the inspection process.
- Roof Material: Different roofing materials, such as asphalt, tile, or metal, may necessitate specialized inspection techniques and equipment. For instance, some materials might be more prone to specific issues, requiring inspectors to have a deeper understanding of those materials, which can influence the overall cost of the inspection.
- Inspector Experience: Highly experienced inspectors bring valuable knowledge and skills to the process, enabling them to identify potential problems more effectively. Their expertise can result in more accurate assessments, but it may also lead to higher inspection fees as their services are often in greater demand.
Cost Breakdown of Roof Inspections

Roof inspections typically range from $100 to $400, depending on various factors. Here’s a general breakdown of what you might expect:
- Basic Visual Inspection: $100 to $200
- Comprehensive Inspection with Equipment (e.g., drones, infrared cameras): $200 to $400
- Additional Services (e.g., lab testing for mold or asbestos): Extra charges may apply
Keep in mind that these are general estimates, and actual costs may vary based on your location and specific requirements.
DIY vs Professional Roof Inspections
While it might be tempting to inspect your roof yourself, professional inspections are highly recommended. Here’s why:
- Safety: Climbing onto a roof can be dangerous, especially without proper equipment and experience.
- Expertise: Professional inspectors have the knowledge and tools to identify issues that may not be visible to the untrained eye.
- Thoroughness: A professional inspection covers all aspects of your roof, ensuring no potential problems are overlooked.
Although DIY inspections can save money, they may not provide the same level of accuracy and reliability as a professional inspection.
📆 When Should You Schedule a Roof Inspection?
Timing is crucial when it comes to roof inspections. Here are some key instances when you should schedule an inspection:
Before Buying or Selling a Home ons every 1-2 years to catch issues early and maintain your roof’s health.
Ensure the roof is in good condition to prevent unexpected repairs down the line. It’s crucial to have a professional inspection to assess any potential issues that could affect the property’s value and your investment.
After Severe Weather
Check for damage from storms, heavy rainfall, or high winds. Look for missing shingles, leaks, or debris accumulation, as these can lead to more significant problems if not addressed promptly.
Regular Maintenance
Schedule regular inspections to keep your roof in optimal condition. This includes cleaning gutters, checking for algae or moss growth, and ensuring flashing is intact, all of which contribute to the longevity of your roof.
By scheduling inspections at these times, you can ensure your roof remains in top condition throughout the year.
⚠️ 5 Signs You Need a Roof Inspection
Certain signs indicate it’s time for a roof inspection. Here are five key indicators:
1. Leaks and Water Stains

If you notice water stains on your ceiling or walls, it’s crucial to get your roof checked as soon as possible. These stains often indicate underlying leaks that can lead to more severe water damage if left unaddressed. Regular inspections can help identify the source of these leaks, allowing for timely repairs and preventing costly renovations in the future.
2. Missing or Damaged Shingles
Visible damage to shingles can significantly compromise your roof’s integrity, making it more susceptible to leaks and further deterioration. Missing shingles expose the underlying layers to the elements, while damaged ones may allow water to seep through. Regularly inspecting your roof for shingle issues ensures that any necessary repairs are made quickly, prolonging the life of your roof.
3. Sagging Roof
A sagging roof is a clear sign of structural issues that require immediate attention. This can be caused by a variety of factors, including water damage, inadequate support, or the weight of accumulated snow. Ignoring this warning can lead to catastrophic failures, so it’s essential to consult a professional to assess the structural integrity and recommend necessary repairs or reinforcements.
4. Increased Energy Bills
Higher energy costs could indicate poor insulation or ventilation in your roof. If your home feels drafty or you notice fluctuating temperatures, it might be time to evaluate your roofing system. Proper insulation helps regulate indoor temperatures, reducing your reliance on heating and cooling systems. An energy audit can help pinpoint areas for improvement, ultimately saving you money in the long run.
5. Moss or Algae Growth
Moss or algae growth on your roof can cause significant damage if not addressed promptly. These organisms thrive in damp conditions and can retain moisture against your shingles, leading to rot and deterioration. Regular cleaning and maintenance can help prevent their growth, and installing zinc or copper strips can inhibit moss and algae from taking hold, ensuring the longevity of your roof.
🔎 How to Find a Reliable Roof Inspector
Finding a trustworthy roof inspector is crucial for an accurate assessment. Here are some tips to help you find a reliable professional:
- Ask for Recommendations: Speak with friends, family, or neighbors who’ve had roof inspections.
- Check Online Reviews: Look at reviews on websites like Google, Yelp, and the Better Business Bureau.
- Verify Credentials: Ensure the inspector is licensed, insured, and certified by relevant industry organizations.
Taking these steps can help you find a qualified roof inspector who will provide a thorough and reliable assessment.
What to Expect During a Roof Inspection
Understanding what happens during a roof inspection can help you prepare. Generally, the process involves:
Visual Inspection
The inspector will thoroughly examine the roof’s surface for visible damage, such as missing shingles, cracks, or signs of wear. This initial assessment helps identify any immediate concerns that could lead to more significant issues if left unaddressed.
Structural Inspection
They’ll conduct a comprehensive check of the roof’s structure, including the attic space and support beams, looking for signs of damage, moisture intrusion, or structural wear. This evaluation ensures that the underlying framework is sound and capable of supporting the roof’s weight.
Detailed Report
After the inspection, you’ll receive a detailed report outlining any issues found, including photos and descriptions of the damage. The report will also include recommended repairs and maintenance tips to help you address the problems and preserve the integrity of your roof.
Knowing what to expect can help you feel more confident and prepared for your roof inspection.
✅ Benefits of Regular Roof Inspections

Regular roof inspections offer numerous benefits, including:
Early Detection of Issue
Catching problems early can prevent costly repairs and extend your roof’s lifespan. During a roof inspection, several common issues may be identified, such as:
- Leaks: Water infiltration can cause significant damage if not addressed promptly.
- Shingle Damage: Missing, cracked, or curled shingles compromise your roof’s protection.
- Flashing Problems: Damaged or improperly installed flashing can lead to leaks and water damage.
Improved Energy Efficiency
A well-maintained roof plays a crucial role in ensuring proper insulation and ventilation, which helps regulate temperature and reduces the energy needed for heating and cooling. By preventing air leaks and maintaining a balanced environment, homeowners can enjoy lower utility bills and a more comfortable living space year-round.
Increased Home Value
Investing in a well-maintained roof not only enhances the aesthetic appeal of your home but also increases its market value. Potential buyers often view a sturdy roof as a sign of a well-cared-for property, making it a key selling point. A new or recently repaired roof can provide buyers with peace of mind, knowing they won’t have to address significant maintenance issues shortly after purchase.
❓ FAQs
Q: How often should I schedule a roof inspection?
It’s recommended to schedule a roof inspection every 1-2 years, or after severe weather events.
Q: Can I inspect my roof myself?
While DIY inspections can save money, professional inspections are safer and more thorough.
Q: What should I do if my roof has damage?
If damage is found during an inspection, follow the inspector’s recommendations for repairs to prevent further issues.
🙌 The Importance of Regular Roof Inspections for Home Safety and Value
Understanding roof inspection costs and the importance of regular inspections can help you maintain your home’s value and safety. By staying proactive, you can catch potential problems early and enjoy the benefits of a well-maintained roof.
At Secured Roofing and Restorations, we pride ourselves on providing reliable and thorough roof inspections. Our team of experts is dedicated to helping homeowners like you protect their investments. Contact us today to schedule your roof inspection and experience the peace of mind that comes with knowing your home is in good hands.
Hail Damage Roof: Signs, Repair & More
Written by : Secured Roofing and Restorations
9 minutes read
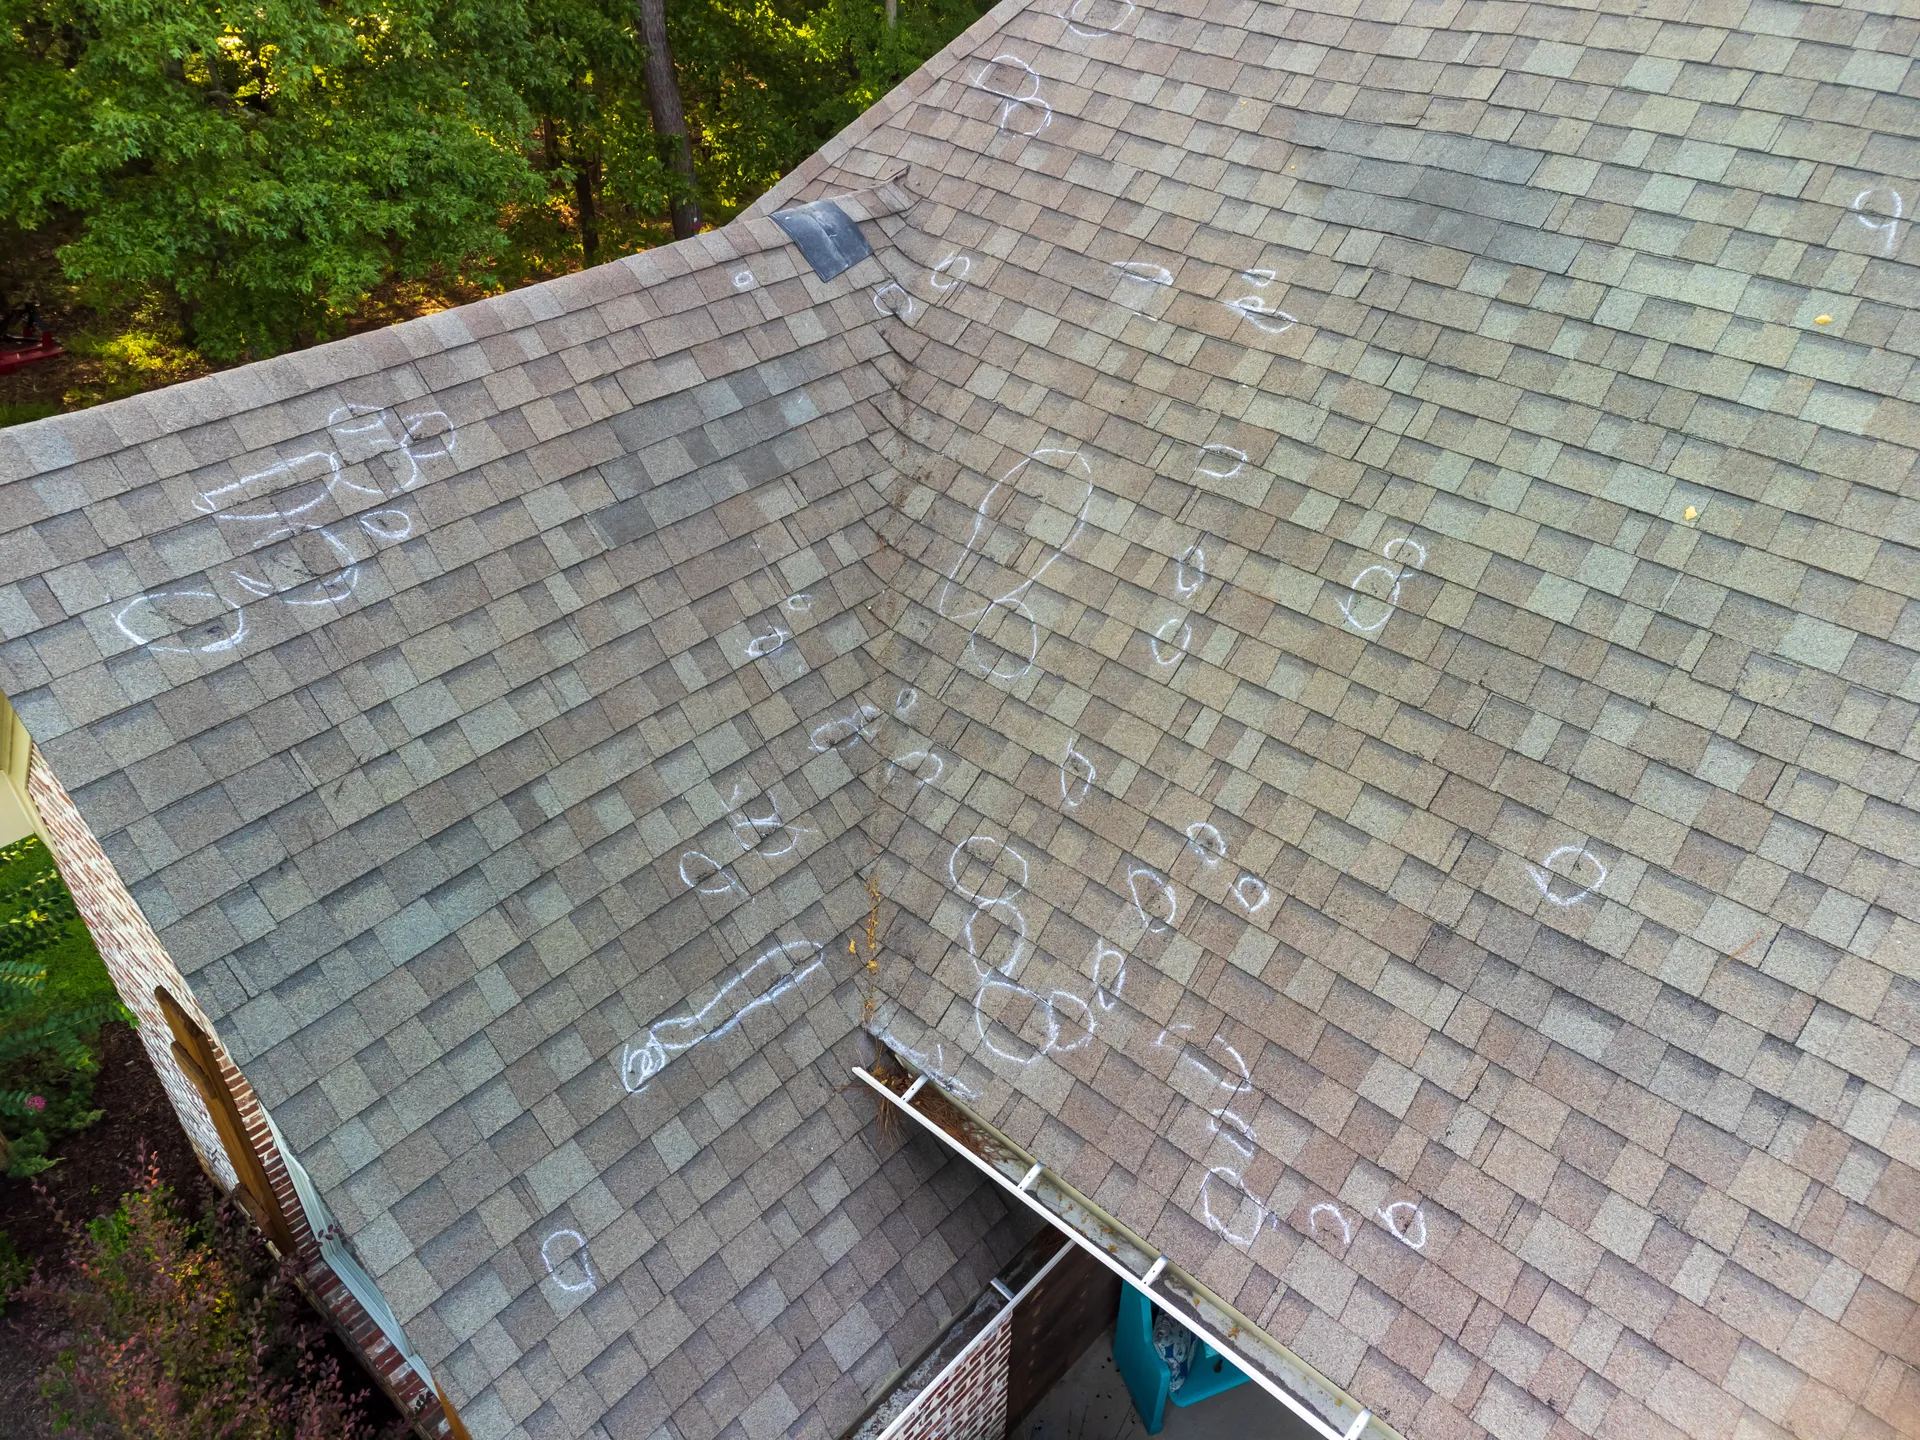
Hail can turn a peaceful day into a homeowner’s worst nightmare in minutes. From minor dents to significant structural damage, hailstorms wreak havoc on roofs, leaving homeowners stressed and unsure of what to do next. If you’ve recently experienced a hailstorm or simply want to be prepared, this article will help you understand hail damage roof signs and the steps to take for repair and prevention, including:
- 7 Signs You Have Hail Damage on Your Roof
- The Impact of Hail Damage on Your Home
- Immediate Steps to Take After a Hailstorm
- Professional Roof Inspection vs. DIY Inspection
- Effective Repair Solutions for Hail-Damaged Roofs
- Preventative Measures to Protect Your Roof
⚠️ 7 Signs You Have Hail Damage on Your Roof
Hail damage can often go unnoticed until it leads to more serious issues. Here are seven key signs that indicate your roof may have sustained hail damage, helping you take proactive steps to protect your home.
1. Dents or Dings in Roof Components
Look for small indentations or dings on the roof surface, particularly in softer materials like asphalt shingles or metal roofing. These imperfections can compromise the roof’s integrity and lead to further damage if not addressed promptly.
2. Granule Loss on Shingles
Check for granules that have washed off the shingles; you may find these in your gutters or on the ground around your home. Granule loss can expose the shingles to UV rays, reducing their lifespan and effectiveness in protecting your home.
3. Cracks or Splits in Shingles

Inspect for visible cracks or splits in the shingles, which can reduce their effectiveness in protecting your home. Even small cracks can allow moisture to seep in, potentially leading to leaks and water damage.
4. Damage to Flashing
Examine the metal flashing around chimneys, vent pipes, and other roof protrusions for any bends, tears, or breaks. Properly sealed flashing is crucial for preventing water from infiltrating these vulnerable areas, so any damage should be repaired immediately.
5. Missing Shingles
Identify any areas where shingles might be completely missing, exposing the underlayment or decking to the elements. Missing shingles can lead to leaks and further deterioration of the roof structure, making it vital to replace them as soon as possible.
6. Water Leaks Inside the Home
Be alert to any signs of water intrusion or leaks inside your home, which can indicate underlying roof damage from hail. Stains on ceilings or walls, or damp spots, are red flags that should prompt a thorough roof inspection.
7. Increased Energy Costs
Notice any unusual increases in your energy bills, which may suggest that your roof’s insulation has been compromised by hail damage. Poor insulation can lead to higher heating and cooling costs, indicating that your roof may need attention to restore its effectiveness.
👉 The Impact of Hail Damage on Your Home
Hail damage can pose a significant threat to your home, leading to costly repairs and long-term structural issues. Understanding the impact of hail on your property is crucial for maintaining its integrity and ensuring your safety.
Structural Integrity
Hail damage can weaken your roof’s structure, increasing the risk of leaks and further deterioration. It’s crucial to address these issues to maintain the structural integrity of your home.
Energy Efficiency
Damaged roofs often lead to energy inefficiency. Gaps and cracks can cause drafts, leading to higher heating and cooling costs.
Aesthetic Appeal
Beyond functionality, hail damage affects the visual appeal of your home. Damaged roofs can significantly reduce your property’s curb appeal and overall value.
❗️ Immediate Steps to Take After a Hailstorm
After a hailstorm, it’s crucial to assess the damage and take immediate action to protect your property. Here are some essential steps to follow to ensure safety and prevent further issues.
Stay Safe
First and foremost, prioritize your safety. Hailstorms can be unpredictable and dangerous, so it’s crucial to stay indoors. Avoid windows and doors, as hail can shatter glass. Wait until the storm has passed completely before venturing outside to assess any potential damage.
Document the Damage
Once it’s safe to go outside, take detailed photographs and notes of any damage caused by the hailstorm. Capture images from multiple angles and make a list of affected areas. This thorough documentation will be invaluable for filing an insurance claim or when consulting professional repair services, ensuring you have the necessary evidence to support your case.
Contact Your Insurance Company
Notify your insurance company as soon as possible to start the claim process. Provide them with all the necessary documentation to expedite the process.
Understanding Your Policy
Review your insurance policy to understand what is covered regarding hail damage. Policies vary, so knowing the specifics can help you file a successful claim.
Filing a Claim
When filing an insurance claim, provide all necessary documentation and be as detailed as possible. Include photos, notes, and any professional inspection reports.
Working with Adjusters
Insurance adjusters assess the damage and determine the claim amount. Be present during their inspection to ensure all damage is noted and accurately assessed.
🔎 Professional Roof Inspection vs. DIY Inspection
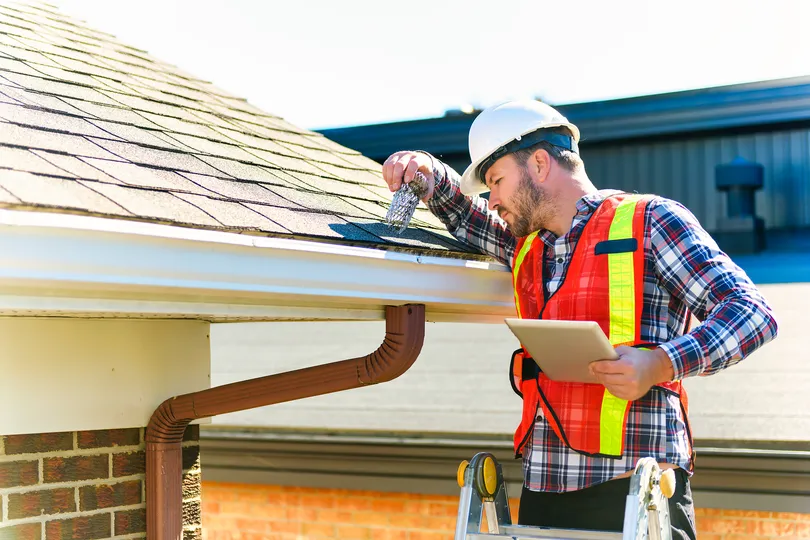
When it’s time for roof inspections, homeowners face the choice between hiring a professional or tackling the task themselves. While a DIY inspection may seem cost-effective, a professional roof inspection offers expertise and thoroughness that can uncover hidden issues. Understanding the differences can help you make an informed decision about the best approach for your home.
Benefits of Professional Inspection
Professional roof inspections provide a thorough assessment, going beyond the surface. With specialized tools and extensive expertise, professionals can detect even the smallest signs of damage, such as minor leaks or wear that may be overlooked by the untrained eye. This attention to detail ensures that potential issues are identified early, allowing for timely repairs and preventing costly damage down the line. Additionally, a professional inspection offers peace of mind, knowing that your roof’s condition is fully evaluated by an expert.
DIY Inspection Tips
If you opt for a DIY inspection, follow safety protocols and be meticulous. Use binoculars for hard-to-reach areas and document everything you find.
Safety First
Always prioritize safety. Use a sturdy ladder, wear non-slip shoes, and avoid inspecting the roof during adverse weather conditions.
Visual Inspection
Conduct a visual inspection from the ground first. Look for obvious signs like dents, cracked shingles, or missing pieces.
Detailed Inspection
For a more thorough inspection, carefully examine the roof’s surface, flashing, and gutters. Check for less obvious damage like granule loss or soft spots.
When to Call a Professional
If you’re unsure about the extent of the damage or feel unsafe conducting a DIY inspection, it’s best to call a professional. They can provide a detailed report and recommendations for repair.
👇 Effective Repair Solutions for Hail-Damaged Roofs
Hail damage can significantly compromise the integrity of your roof, making timely repairs essential. Here we’ll explore effective repair solutions to restore your roof and protect your home from further issues.
Temporary Fixes
Temporary fixes, such as tarping, serve as a crucial stopgap to prevent further damage to your property until professional repairs can be arranged. These solutions are particularly useful when the damage is extensive and requires immediate attention, as they help to shield your home from the elements, minimizing additional issues like leaks or mold growth.
Permanent Repairs
Permanent repairs encompass a range of tasks, including replacing damaged shingles, sealing leaks, and reinforcing the roof’s structural integrity. Engaging professional roofing contractors is vital for these tasks, as they bring expertise and experience to ensure that repairs are not only effective but also durable, providing peace of mind for homeowners.
Complete Roof Replacement
In instances where damage is severe, a complete roof replacement may be the only viable option. Although this can represent a significant financial investment, it is essential for ensuring the safety, stability, and longevity of your home. A new roof not only enhances curb appeal but also increases energy efficiency and protects against future weather-related issues.
✋ Preventative Measures to Protect Your Roof
Here are preventative measures that can help protect your roof from damage and extend its lifespan. By implementing these strategies, you can ensure your roof remains in good condition, safeguarding your home against potential issues.
Regular Maintenance

Regular roof maintenance is crucial for longevity and safety. This includes tasks such as cleaning gutters to ensure proper drainage and inspecting for minor damage like loose shingles or small leaks. By addressing these issues early, homeowners can avoid costly repairs and major problems in the future. It’s a good idea to schedule annual inspections with a professional to keep your roof in top shape and extend its lifespan.
Install Hail-Resistant Materials
When it comes to safeguarding your roof, consider upgrading to hail-resistant roofing materials. Options like impact-resistant shingles and metal roofs are designed to withstand harsh weather conditions, including hail storms. Not only do these materials provide better protection, but they can also enhance your home’s overall value and appeal, making them a worthwhile investment for homeowners concerned about extreme weather.
Reinforce Vulnerable Areas
Certain areas of your roof, such as skylights, vents, and chimneys, are more susceptible to damage during hailstorms. To protect these vulnerable spots, reinforce them with protective covers or impact-resistant materials. This additional layer of defense can significantly minimize damage, ensuring that your roof remains intact and functional even in severe weather conditions. Taking these proactive measures can save you time and money in repairs down the road.
🙌 Protect Your Home: Expert Hail Damage Repair Services
Addressing hail damage to your roof requires prompt action and expert guidance to safeguard your home. At Secured Roofing and Restorations, we are dedicated to providing reliable and professional services tailored to your exterior needs. Our experienced team understands the intricacies of hail damage and offers thorough inspections, effective repairs, and top-quality materials to ensure your home remains protected. Trust us to be your partner in maintaining your home’s integrity and value. Contact us today for a free consultation and let us help you restore your peace of mind.
What Is a Roof Ridge Vent? (Homeowners Guide)
Written by : Secured Roofing and Restorations
10 minutes read

Maintaining your home’s roof can be significantly improved by understanding components like roof ridge vents, which are often overlooked yet crucial to any roofing system. This blog will guide you through everything you need to know about roof ridge vents, including how they work, their benefits, installation tips, and more, including:
- What a roof ridge vent is
- Different types of roof ridge vents
- The essentials of roof ventilation
- Common misconceptions about roof ridge vents
- Signs that your home needs better ventilation
- 4 steps to install roof ridge vents
- How to maintain your roof ridge vent
- Cost considerations for roof ridge vents
- FAQs
🤔 What Is a Roof Ridge Vent?
Roof ridge vents are essential components installed at the peak of a pitched roof, designed to facilitate the escape of hot, humid air from the attic space. By allowing this warm air to exit, roof ridge vents help maintain a more comfortable and stable indoor environment. This continuous strip of venting runs along the roof’s ridge, ensuring a balanced airflow that not only extends the lifespan of your roof but also significantly improves indoor air quality. With proper installation, these vents can effectively prevent issues such as mold growth and structural damage caused by trapped moisture.
How Roof Ridge Vents Work
Roof ridge vents operate based on the simple yet effective principle of natural convection. As warm air rises, it escapes through the ridge vent, creating a low-pressure area in the attic. This low pressure allows cooler air to be drawn in through soffit vents located at the eaves of the roof. The combination of rising warm air and incoming cool air leads to a constant exchange of air, keeping your attic cool and dry. This process is particularly crucial in warmer months when heat buildup can lead to increased humidity levels, potentially damaging insulation and wood structures.
Benefits of Installing Roof Ridge Vents
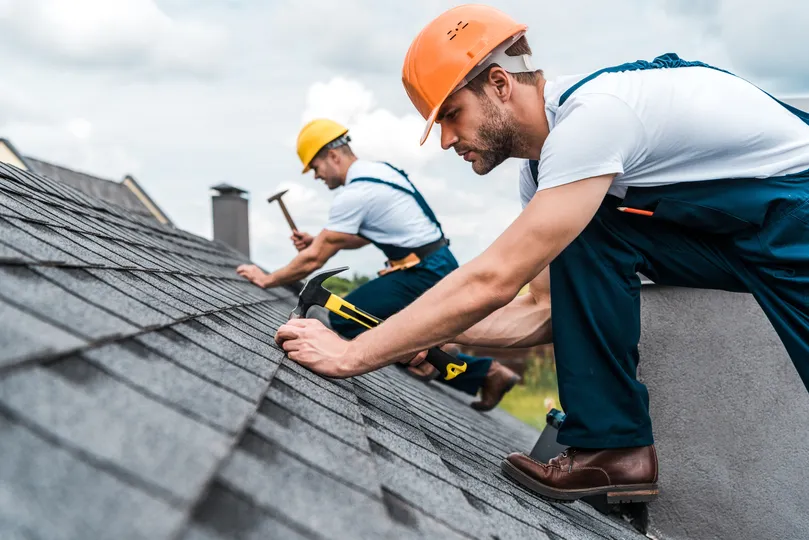
Installing roof ridge vents provides numerous advantages that contribute to the overall health of your home, including:
- Improved attic ventilation: Crucial for regulating indoor temperatures.
- Reduced energy costs: A well-ventilated attic helps your HVAC system operate more efficiently.
- Extended roof life: Proper ventilation manages moisture levels, preventing premature deterioration from heat and humidity.
- Healthier living environment: Balanced airflow reduces the likelihood of mold growth and maintains optimal indoor air quality.
Overall, the installation of roof ridge vents is a smart investment for any homeowner looking to enhance their home’s comfort and durability.
👇 Types of Roof Ridge Vents
There are various types of roof ridge vents available, each with its own advantages. Some common types include shingle-over vents, aluminum vents, and plastic vents.
Shingle-Over Vents
Shingle-over vents are designed to be covered with shingles, making them nearly invisible when installed properly. This feature allows them to blend seamlessly with the overall aesthetics of your roof, enhancing its visual appeal while still functioning effectively. These vents provide excellent ventilation, allowing air to circulate freely and helping to regulate temperature within your home. By preventing moisture buildup and reducing heat accumulation, shingle-over vents contribute to the longevity of your roofing materials and improve the energy efficiency of your home.
Aluminum Vents
Aluminum vents stand out for their durability and corrosion resistance, making them an ideal choice for various climates. Unlike other materials, aluminum does not rust, ensuring that your vents maintain their structural integrity over time. These vents offer robust ventilation capabilities, effectively allowing stale air to escape while letting fresh air in. Their lightweight nature makes them easy to install, and they often come in pre-fabricated designs that can fit various roofing styles. Additionally, aluminum vents can be painted or finished to match your roof, providing both functionality and aesthetic appeal.
Plastic Vents
Plastic vents are an excellent option for homeowners seeking a lightweight and cost-effective solution for roof ventilation. These vents are typically made from high-quality, UV-resistant plastic, ensuring they can withstand harsh weather conditions without fading or degrading. Available in a variety of colors, plastic vents allow you to customize their appearance, making it easy to match them with your roof’s design. Their affordability does not compromise performance, as they still provide adequate ventilation to maintain a comfortable indoor environment. Additionally, plastic vents are often easy to install and require minimal maintenance, making them a practical choice for many homeowners.
❗️ The Essentials of Roof Ventilation
Proper roof ventilation is essential for maintaining a healthy home. It prevents moisture buildup, reduces energy costs, and prolongs the life of your roof.
Importance of Balanced Ventilation
Balanced ventilation ensures that your attic remains at an optimal temperature. It involves a combination of intake and exhaust vents to facilitate airflow.
Energy Efficiency
A well-ventilated attic reduces the workload on your HVAC system, leading to lower energy bills. It ensures that your home stays cool in summer and warm in winter.
Preventing Moisture Damage
Moisture buildup can lead to mold growth and structural damage. Proper roof ventilation prevents these issues, protecting your home and health.
🫢 Common Misconceptions About Roof Ridge Vents
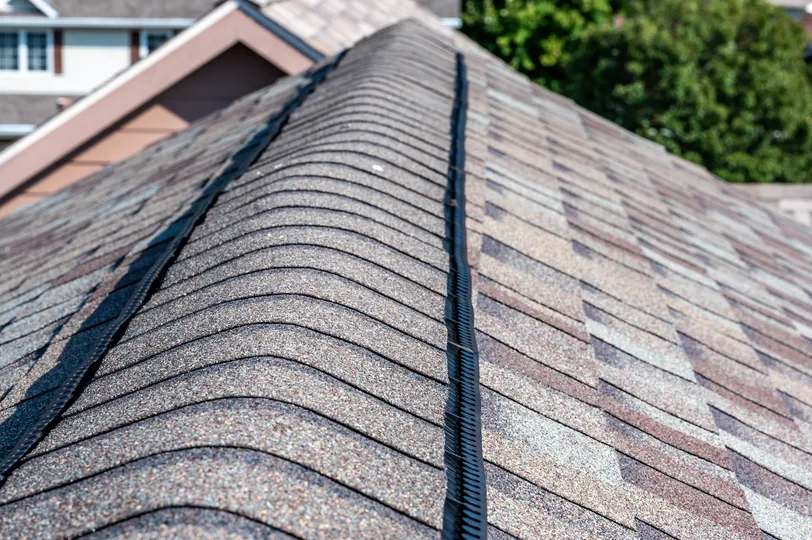
There are several misconceptions about roof ridge vents. Some homeowners believe they are unnecessary or ineffective.
Myth: Roof Ridge Vents Are Unnecessary
Some believe that roof ridge vents are not essential. However, proper ventilation is crucial for maintaining a healthy home environment.
Myth: Roof Ridge Vents Cause Leaks
Another misconception is that roof ridge vents cause leaks. When installed correctly, they are watertight and do not contribute to leaks.
Myth: Ridge Vents Are Only for Warm Climates
Ridge vents are effective in all climates. They help regulate temperature and prevent moisture buildup, whether you live in a warm or cold region.
⚠️ Signs That Your Home Needs Better Ventilation
Poor ventilation can lead to several issues, including high energy bills, mold growth, and structural damage. Look out for these signs:
- High Energy Bills: If your energy bills are unusually high, it could be due to poor roof ventilation. An overheated attic forces your HVAC system to work harder.
- Mold and Mildew: Mold and mildew growth in your attic or upper floors indicate excessive moisture. Proper ventilation can prevent these issues.
- Sagging Roof Deck: A sagging roof deck is a sign of moisture damage. It can weaken your roof’s structure and lead to costly repairs.
- Condensation on Windows: If you notice moisture accumulating on your windows, it’s a sign of high humidity levels that can be alleviated by improved ventilation.
- Stale or Stuffiness in the Air: A persistent stuffy or stale smell indoors can indicate that air is not circulating properly, which can be improved with better ventilation.
- Frequent Allergies or Respiratory Issues: If you or your family members experience frequent allergies or respiratory problems, poor ventilation may be a contributing factor.
- Uneven Temperature Distribution: If certain rooms feel significantly warmer or cooler than others, it may be due to inadequate airflow and ventilation.
- Excessive Dust Buildup: A noticeable increase in dust accumulation can signal that your home lacks proper air exchange, leading to stagnant air.
🛠️ 4 Steps to Install Roof Ridge Vents
Installing roof ridge vents is a task that requires careful planning and execution. Here’s a step-by-step guide:
1. Prepare the Roof
Start by carefully removing the shingles along the roof’s ridge. Use a flat bar or roofing shovel to gently lift the shingles without causing damage to the surrounding ones. Take your time to ensure the area is clean and free of debris, as any leftover material could affect the installation of the vent. Inspect the underlying roof deck for any signs of damage or rot that may need attention before proceeding.
2. Cut the Vent Slot
Using a circular saw, carefully cut a slot along the roof’s ridge. Before cutting, measure the width required for the vent you are installing, typically the manufacturer’s specifications. Mark the slot’s dimensions with a chalk line, ensuring it’s straight. When cutting, maintain a steady hand and wear appropriate safety gear, such as goggles and a dust mask, to protect yourself from debris.
3. Install the Vent
Once the slot is cut, place the ridge vent over it, ensuring it covers the entire opening. Secure the vent with nails, using a hammer or nail gun, at regular intervals as specified by the vent manufacturer. Check that the vent is aligned correctly along the ridge and sits flush with the roof. This alignment is crucial to prevent water from seeping underneath. If necessary, use a level to confirm the vent is even before securing it completely.
4. Replace the Shingles
Carefully replace the shingles over the newly installed vent. Start from one end and work your way to the other, ensuring each shingle overlaps the edge of the vent. This overlap should cover the nails used in the vent installation to create a watertight seal. Pay attention to the alignment of the shingles to maintain a seamless finish that blends naturally with the existing roof. Once all shingles are replaced, double-check for any gaps or areas that may need additional sealing.
💡 How to Maintain Your Roof Ridge Vent
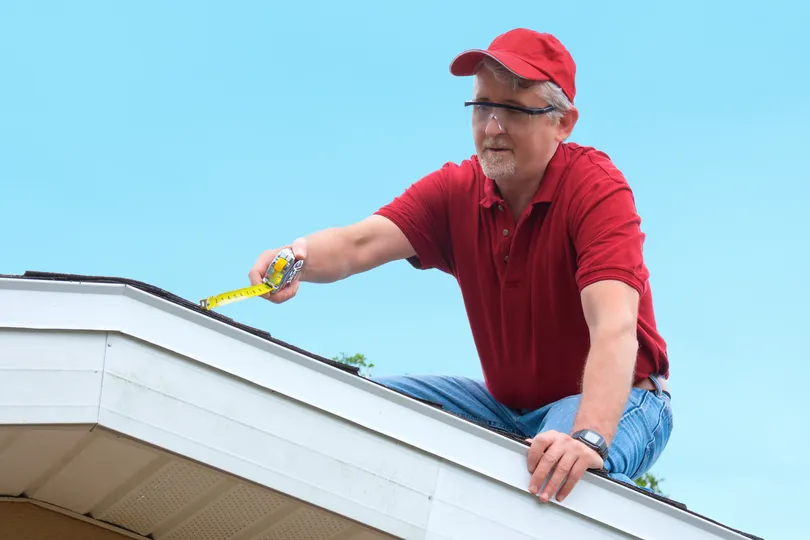
Maintaining your roof ridge vent is essential for ensuring its effectiveness. Regular inspections and cleaning can prevent issues.
Regular Inspections
Conduct regular inspections to check for any damage or blockages. Ensure that the vent is securely attached and free of debris.
Cleaning the Vent
Clean the vent periodically to remove any debris or buildup. This will ensure that air can flow freely through the vent.
Professional Maintenance
Consider hiring a professional for regular maintenance. They can identify and address any issues that you may have missed.
💵 Cost Considerations for Roof Ridge Vents
The cost of installing roof ridge vents can vary based on several factors, including the type of vent and the complexity of the installation.
Material Costs
The cost of the vent itself can vary. Shingle-over vents are typically more expensive than plastic or aluminum vents.
Installation Costs
Installation costs can vary based on the complexity of the job. Hiring a professional can ensure that the job is done correctly.
Long-Term Savings
While there is an initial cost, installing roof ridge vents can lead to long-term savings. Improved energy efficiency can reduce your utility bills.
❓ FAQs
Q: Are Roof Ridge Vents Necessary?
Yes, roof ridge vents are crucial for maintaining proper ventilation in your attic. They help regulate temperature and prevent moisture buildup.
Q: How Long Do Roof Ridge Vents Last?
Roof ridge vents can last as long as your roof. Regular maintenance can extend their lifespan.
Q: Can I Install Roof Ridge Vents Myself?
While it is possible to install roof ridge vents yourself, hiring a professional is recommended to ensure proper installation.
🙌 Maximize Your Home’s Potential with Roof Ridge Vents
Understanding and installing roof ridge vents can significantly benefit your home. From improved energy efficiency to preventing moisture damage, the advantages are clear. At Secured Roofing and Restorations, we are committed to helping homeowners like you achieve the best results for your roofing needs. Our expertise and dedication ensure that your roof is in the best hands. Reach out to us today to learn more about how we can help you.
If you need assistance with your roofing project, our team at Secured Roofing and Restorations is here to help. Contact us now and experience the difference our professional services can make.